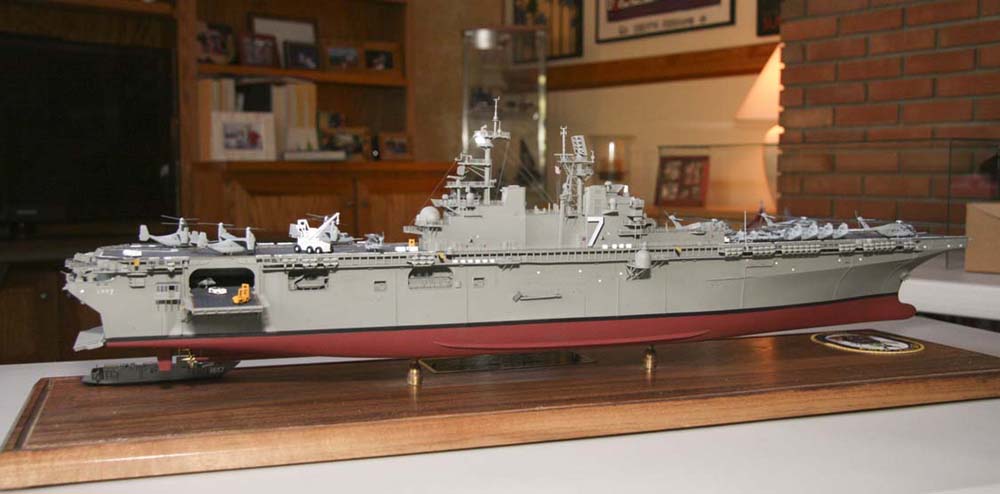
1/350 USS Iwo Jima LHD-7 (Gallery)
|
by Martin J Quinn |
1/350 USS Iwo Jima LHD-7 (Gallery)
The Iwo Jima is a very large ship. In fact, it's just about the same size as a World War II Essex-class carrier. So, I jumped ahead a few steps in the instructions, and added the separate bulbous nose - which is split in two pieces - on the hull and the bilge keels. Why Gallery left these for after the well deck was installed is a mystery to me, but I wanted to get them out of the way. I did find a pretty pronounced seam in the nose, if I had to do it again; I'd glue each half of the nose on separately and then deal with the seam on the center line.
I moved back to the beginning of the instructions and started working on the well deck. The fit is pretty good, and there is lots of room for super detailing and/or lighting, if that is your thing. Looking at references, Gallery doesn't tell you to use the photo-etch railings in the kit to rail the catwalks in the well deck, so I used left over photo-etch rail to do this. I also continued to refine the seam in the bow, which I never really got to completely disappear. I also drilled holes in the bottom of the hull for the finials I would use to mount Iwo Jima to her base.
I will say that the instructions are vague in spots. For example, you are told to either "Cut/Remove" or "Repair". Uh, what? It got me for a while, until I compared photos of the Wasp and Iwo Jima, and realized the instructions were telling you to remove moldings or fill locator holes for parts unique to Wasp. With that figured out, I started slicing, dicing and filling.
Once that was done and smoothed out, I moved onto adding the struts and shafts, so I could paint the lower portion of the hull.
in between painting the hull, letting it dry, masking, and more painting, I started working on the defensive weapons onboard. These were some of the more fiddly parts of the models, and frankly, the fit was not very good.
With the weapons set aside to dry, I did more work on the well deck, making sure it was attached firmly to the sides of the hull. I then added the hangar deck. The fit here was good, and the hangar deck is pretty well detailed, especially considering you cant see much once the flight deck is on.
This class has a pronounced feature I call lattice around the sides of hull, on the platform that run under the edge of the flight deck. Some of these parts were short molded or bent. They went on easy enough, but take care when securing the flight deck to make sure you line them up correctly. You must also add the two elevators before the flight deck, as they slide into the channels on either side of the opening to the hangar bay.
One faux pas here in the instruction: at this point Gallery should mention you need to add railings to the lower platform before adding the flight deck. They dont, and the railings are damn near impossible to add later on. So much so that I just left them off.
With the flight deck on, there are platforms and other structures to be added all around the hull. What they are all for, I couldnt tell you, but they add to the general busy look of the ship.
At this point its time to work on the island. Fit was pretty decent, except for two spots. The first being the funnels, the second being the aft mast. For some reason Gallery breaks this into multiple sections, which make it a pain to line up straight, plus its not a very strong joint, which could cause problems when rigging later on in the build.
There are plenty of small parts on the island both plastic and photo-etch so take your time and study the instructions carefully as you move along. The island is different than the one in the Wasp kit, and looks impressive when finished.
Once I had finished the island, there was plenty of work around the flight deck, adding chaff launchers, firefighting equipment and other details on the catwalks. Once these were added, I started adding the photo-etch railings to the island and aforementioned catwalks. The toughest photo-etch are the safety nets, especially the ones around the bow. It would be nice if manufacturers would add a very thin mold line where these nets go, so you could have a reference and mounting point when adding them.
With all these details added, you still have to add the life raft canisters and their associated brackets. I added all the brackets first, then added the canisters last.
The ship was pretty much done at this point, but there was plenty left to do, with all the deck equipment and the aircraft.
The deck equipment is okay the fit of the crane being the worst of all the parts. The clear aircraft gave me fit problems as well, especially the Ospreys, whos tail comes as a separate piece. I found it a challenge to get these to fit properly.
As I was building the deck gear and aircraft, I was also decaling. The decals look good when laid down, but the main decals on the flight deck should have been cut into multiple pieces for ease of application. I ended cutting them myself, but still found some of the decals thin and easily damaged. In fact, the yellow warning strip at the bow was completely destroyed I ended up finishing the model without it. I may go back and try and replicate it with paint when I find the time.
When the decals were finished the ones the island are especially striking I rigged the model using nylon quilting thread, then dullcoated. After the air group finished and added to the flight deck along with the deck equipment , the model was given another few coats of dull to even everything out.
The last thing I did was build the hovercraft and landing craft. These went together okay, but I did find all the little tanks, trucks and other vehicles a bit fiddly. I ended up only build one hovercraft which is tucked in the well deck and one landing craft, which is attached to the base the model is displayed on.
Conclusions
All in all, this is a very nice kit. Everything you need is right
in the box, other than rigging and paint. The model fits together
fairly well, and looks like an LHD. Its very impressive in size
and looks good when finished. Most importantly, I had a lot of fun
building it. For the most part, any issues that arose during the
build were of my own making, and not an issue with the kit.
For anyone who wants a modern Navy gator freighter in their scale model
fleet cant go wrong with this kit. Highly recommended! Thanks
to MRC for the review sample.
