1/350 USS Harpers Ferry LSD-49 (Orange Hobby)
|
by Keith Bender |
1/350 USS Harpers Ferry LSD-49 (Orange Hobby)
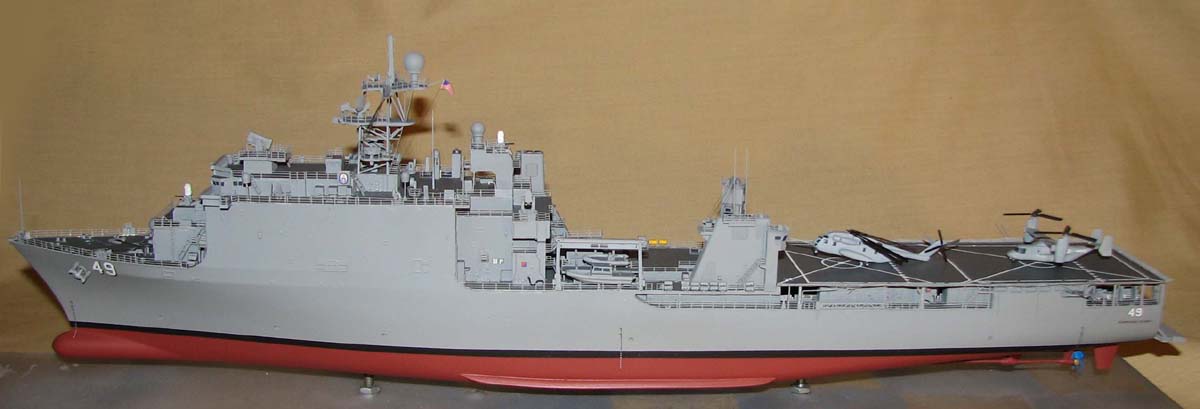
Orange Hobby's 1:350 multi media resin kit of the USS Harpers Ferry LSD-49. After reviewing the kits directions, parts and decals it was time to dig in and give it a go. First step was to put all the catwalks and railings in the well area then paint the interior gray and grimy black on the simulated rubber protective bulkheads. As with all photo etch before removing any parts from their sprues I give the sheet a very light sanding with 400 grit wet dry paper to remove any residue left from the PE process. I do this in a one direction away from myself to avoid kinking the sheet. Doing this helps the paint to stick better.Since I built my kit full hull I painted the interior of the lower half during this time. A note on your time frame you are building you LSD. At different times these ship had the well deck overhead painted white and other times gray just as the rest of the ship. It would be wise to research the vessel you intend to build whether it be LSD-49 or 50-52 to see which color suits the time frame you are building. I went with gray.Most ship kits the manufactures instruct you to build the ship then attach the lower hull after the entire model is assembled. Orange Hobby suggest this as well. I always found it is not a good idea to follow that. Of all the part hull ship need a lot of rubber bands, tape etc... to hold the lower hull in place white the glue sets over night. Doing this will definitely do much damage to your already finished upper hull. I never understood how the manufactures they can't see that.
The lower hull needed some attention to get it straight enough to fasten to the top. The top half needed some TLC to so one at a time I put them in the over set at 300. I let each half in there till it's almost too hot to touch. I remove it then bend it gently in the opposite direction of it's warp the same distance it was in it's original bend. I place it on the clod counter top to cool faster and wait to see it if it flat. The bottom took several tries while the top wasn't too bad.
Ok back to the build. So the interior paint has been finished and the hull halves are together with the seams filled using automotive filler, Bondo. I waited a few days the sand down the filler at the seam and used an automotive scratch filler primer several times. When I had the ship all primed I sprayed the deck gray and let dry over night. The kit comes with a lazier cut wooden stand to either build or display your model on. I decided not to use it and use one of my own building mounts. I put the shafts and rudders , filled , sanded and primed that area.
The directions are pretty straight forward after that so I decided i would follow them, somewhat. Starting on page 2/12 your to place many of the resin locker and very small structures on the decks then it shows your to put the PE on. I found it easier to build them as sub-assemblies and keep aside for paint later on. I did place most of the main deck PE railings where I could. In doing this and since the deck gray has been painted already i use a blade to remove the paint in the area where the PE railings are to be so the glue holds. We should all know what happens when you glue something to paint.
Before PE-ing the bow area I removed the molded on anchor chain and put my own 40 lpi chain down which is a big improvement. You don't have to do that but it makes a world of difference. Pages 6 and 7 show the outboard railing and deck area to be detailed. This is all below the flight deck area. Before doing this I did take notice that the manufacture has kept enclosed a few areas under the flight deck that should be open air. The largest being after about the last 1.5" of the ship on either side. I used a Dremel and a burr bit to hog out these areas. It took some time but it is well worth it in the end. Most builders won't notice or may not even care but I rather have it as close to the full size vessel as possible. I believe Orange Hobby kept these areas filled in due to removing the parts from the mold.
While building the main mast structure with it's many platforms i noticed they do not supply and vertical ladders nor show where they would go. How's a sailor suppose to maintain these areas if he can't get up there. This area you have to research and place ladders accordingly. With all sub-assemblies complete I gave everything a shot of primer then the outside gray several times. Finish assembly went together within a day. Next I add all the small details with their PE. Open finishing the model assembly all was give a good several coats of clear for the decal work next.
By some advice of others i did not use the flight deck decal which is one large sheet but isn't the easiest thing to work with. I am told it causes more problems then it's worth. I cut all the landing area stripes from a sheet of microfilm white decal sheet. The model was given many coats of flat clear after all decals were set. A big down fall of the kit is they did not supply any helos. I flew over from two different kits a CH-53E and a V-22 and spotted them on deck.
You may notice the ships propellers have blue blades. The navy has been using experiment paints to help with keeping the hull and other areas clean of fouling organisms. I just happen to dig up a few photos of this class dry-docked showing the props.
A final note: The model went together pretty well for a large resin kit. Yes there were a few bumps on the road but that can always be expected from any kit and especially a resin one. I did deviate from the directions a few times but that was all from learning over the years that you can't always follow direction. Time in building was approximate four months of 30 minute lunch times while at work less the major painting which was done at home.
You can find a in-box review of the kit here.
