by Robert Apfelzweig
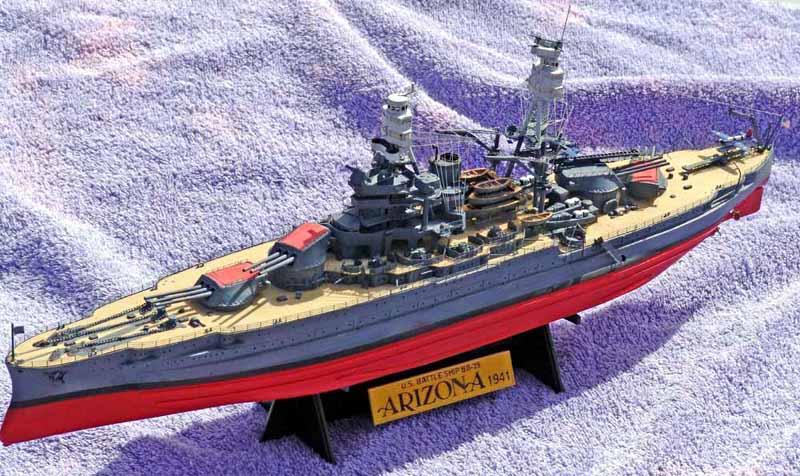
1/350 USS Arizona BB-39 (Banner)
These are photos of my just-completed model of Banners 1:350 scale USS Arizona as she would have appeared in early December 1941. As anyone who has built, or read about, this now out-of-production kit knows, it is mostly an enlargement of the old Revell 1:426 Arizona kit that has been around for about 45 or 50 years, complete with the older kits ill-designed layer-cake gun deck, bridge bulkheads and fighting tops. I augmented this kit with Eduards PE set, which has the major advantage of replacing every bulkhead with a properly designed brass strip containing correctly-sized portholes and door openings, as well as folding brass for the two fighting tops. Indeed, almost the entire bridge structure above the conning tower is brass. Although meant to fully replace the corresponding plastic parts, I found it more convenient to glue the appropriate brass bulkhead segments directly onto the plastic ones for the gun deck, then re-drill through the brass portholes. I replaced the 5-in. .51-caliber casemate gun barrels with LArsenal 5-in. .38 cal. brass barrels. No one seems to make 5-in. .51 caliber brass gun barrels, but to correctly install them would require scratch-building open casemate gun mounts, and so I chose to retain the rather crude little closed cylinders of the Banner kit (into which I drilled 4 portholes, two on each side of the gun). I simply cut off the plastic barrels, drilled a small hole where they had been attached, and glued in the brass ones, which in any case are several mm longer and look more realistic. The 5-in. .25 caliber anti-aircraft guns were equally divided between very similar Veteran and LArsenal mounts, since I happened to have 4 of each. I also used LArsenal brass 14-in. .50 caliber guns for the turrets. The Arizona and her sistership Pennsylvania, like the Nevada and New York class battleships before them, had .45 caliber heavy guns, which were upgraded to .50 caliber in the subsequent New Mexico and California class battleships. However, as pointed out by Charles Landrum in his description of how he built and modified this kit, Banner places its plastic 14-in. gun barrels too far back in the turret, so that the barrels look too short when protruding from the turret faces. Using the longer brass barrels solved this problem, though I had to scratch-build the barrel axles from conveniently sized sprue sections. I did this by placing a suitably cut section of cylindrical sprue into the turret section meant to receive the corresponding kit part, then marked the places on the sprue directly opposite the turret gun openings. I then drilled holes into the sprue as carefully as I could evenly along the sprue length and added some plastic end pins so that, once the brass barrels were glued into place, the sprue axle would rotate just as the original kit part was meant to do. Thus all three guns in each turret elevate together. As designed, the Banner kit allows one to raise or lower the individual plastic gun barrels, which was impossible on the actual USS Arizona. As Charles Landrum did, I glued sections of index cards onto the rear half of the turret underside, after first gluing a couple of steel washers to the underside of the rear of the turret roof. This added bulk counterbalanced the weight of the brass barrels, balancing the turrets once they were placed into position on the barbettes. The kit-provided plastic caps meant to allow the turrets to rotate in place were too flimsy and loose, so I just inserted small screws into the central tubes of the turrets and screwed them into place, securing the turrets to the barbettes with the screws cap prior to gluing the upper hull to the lower one. The hull fit, incidentally, was quite good, and I only had to fill in with putty a small gap created at the bows cutwater. The hull itself was modified by trimming the forward end of the armor belt, by shimming the supports for the forecastle deck and rear quarterdeck sections so that their seams were even with the deck sections built onto the hull. I also added narrow flat polystyrene strips to the keel and torpedo blisters, as Landrum described. Other modifications: A 0.032 in. brass rod for the small mast atop the main fighting top, oval liferafts on either side of the third turret (leftovers from another kit, I forget which one; a photo of the Arizona after the Pearl Harbor attack shows the substitute rafts to be the correct size and shape), sprue to replace the columns for the secondary gun directors on the bridge (the molded-on kit ones are too narrow) and 3 mm polystyrene rods replacing the tripod structures of both masts. These were somewhat difficult to get just the right length, especially for the mainmast. I used clear plastic cut from supermarket fruit containers to glaze the windows on the inside of the fighting tops and the structures on either side of the funnel, but the cyanoacrylate superglue required to adhere them to these brass pieces often fogged the plastic, so this effort was only partly successful. I decided to paint the tails and rudders of the floatplanes red to match the turret tops, since from what Ive read these colors were used to identify specific ships and the floatplanes assigned to them. I used Pollyscale 5-N paint for the hull and superstructure; 5-S may have been a more precise color, but the one color photo I have seen of the Arizona soon after her destruction seems to indicate that this paler, rather than darker, blue may be a closer match. She may have received the blue paint scheme in late October 1941, during her final drydocking and general maintenance period. Upper tripods and fighting tops are Tamiya light gray, and I used a mixture of Tamiya colors (mostly desert yellow and white, with a few drops of brown) for the pale wood color of her decks. The red turret tops were Tamiya flat red mixed with a bit of flat white to simulate the weathering that would have taken place beneath the Hawaiian sun. The lower hull was sprayed with Testors flat red. Rigging was done, as I always do in my ship models, with stretched sprue. Lastly, good and complete as it is, the Eduard photo-etch set does not include railings for the main and gun decks; I used material from the Toms Modelworks 1:350 railing set for these.
