 |
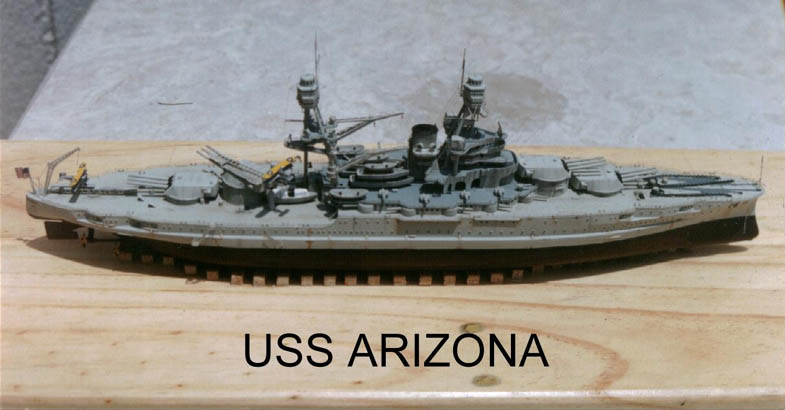
| The Revell 1/426 USS Arizona in a Pre-war Color and Construction Scheme with Gold Medal Model Photoetch sets |
| When I was 14 years old, I built an old Revell Arizona. I did it out
of the box but being as playful as I was, it didn't last in the shelf.
So I bought the same kit a year ago and purchased my FIRST photo-etch set
from Loren Perry of Gold
Medal Models. I was kind of scared working on it since it was
my first time. I had an upcoming exhibit then and my work eats so much
of my remaining idle hours. So I asked the help and mentoring of my friend
and fellow IPMS Philippines member, Ping Malay.
We drilled all the port holes of the hull. We sanded off the kit-molded railings. We scratch-built the bow's pole and replaced it with a metal pin to fit. Then placed a punched-out styrene circle to glue it on top of the pin ( some-what like a hat ). We sanded off the anchor chains and replaced them with those cheap chains from fake-jewelry shops. We sprayed it with with black and applied charcoal from the nearest charcoal pencil we can find. That will give it the metal-used-up look. Note that the port side needs only one anchor and the starboard side uses two. This is based on the references we used. We replaced the kit's planes and replaced them with Bi-planes by scratch building them. We colored the bi-planes' wings gloss lemon yellow and the fuselage chrome silver. Then applied the appropriate decals for the period. We reinforced the hull at their glue points with epoxy since we have plans of drilling it into a base instead of using the kit's truss-like stands. The epoxy will prevent the hull-halves to split later and ruining the putty and paint. With photo-etch...never use those unstable stands unless you put plastic rods to connect both of them and glue the ship onto it. We painted the ship's vertical surfaces light gull grey and the vertical surfaces with deck tan. The ship's color should be much lighter almost reaching off-white color. We painted the hull bottom hull red and the boot black. The ship had to be assembled in subassemblies to allow easy additions of the PE's. The turrets and deck guns should NOT be glued until all the PE are attached. When all the PE's are attached to their respective places (except for the main deck railings ), we glued them together. Then we glued the railings in place. We used stretched sprues for the rigging which from our reference was much of a challenge. It took us a half day to perfect those riggings. We finished the ship by weathering it with pastels. I used black, gray and burnt amber for this. Then we over-sprayed the model with Humbrol Matte Cote. This will remove the glue shines, protect the pastels and it will give the weathering a better effect - somewhat real and not powdery. it will also blend those touch-ups you do after painting and applying the PE's. We got a cheap base from a pine-wood dealer and varnished it. We sealed it with a glass cover to protect the details especially those accommodation ladders and the rigging. The kit is worth it. As a kit alone, it isn't much considering it was worth $10. The GMM parts made it look expensive - say about $100 if it was sol d to a friend! Thanks to Loren Perry's quality products and Ping Malay's extensive patience. We will join this model on the upcoming National Competition this January 2002 here in the Philippines. 'Hope it wins! Noel Carpio/Ping Malay |
| Links: |
