by Paul Neuhaus
1/700 HMS Nelson (Tamiya)
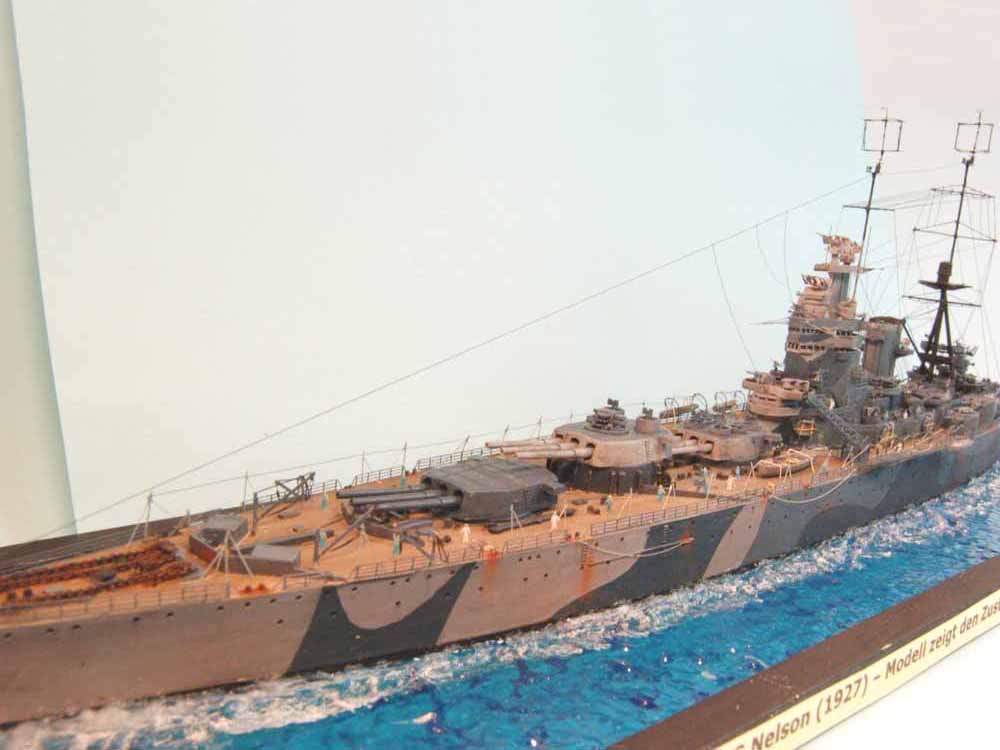
Today Id like to show you my latest model the HMS Nelson from Tamiya, scale 1/700. This is an old kit of 1974.
The quality of the kit and the accuracy is not the same as one is used to from Tamiya. But with a little patience, filling and grinding these problems can be solved quite easily.
My choice of how to show the ship fell to the year 1943 when she wore an interesting camouflage. Investigations in the Internet didnt bring up many useful photos from that time but a useful colour pattern scheme which I finally could use for my project. First I built the hull with deck and made the port holes a little deeper with a small modelling tool and a suitable sized drill. The camouflage was then applied to the hull in a couple of steps. After applying one colour, the next one was masked, painted and so on. I painted nearly all the parts of the model with an airbrush. In my point of view a lot of small items are ruined by applying paint with a brush - which very often is too thick and covers small details and ruins them. (or I cant handle a paintbrush properly ! ..). I used Gunze Sangyo paints on acrylic basis for the complete painting.
The PE parts are from White Ensign Models, who offers a special set for this particular model. It contains a lot of nice details to polish up the model and also can be used for Nelsons sister vessel, the Rodney which differed in some points. I however would not recommend this set to a beginner. The parts are very thin and the material is rather soft. Slight mishandling ends up to a ruined part. This is also the reason why I did not use the railings which are also included in the set. My choice fell in the ones offered by Saemann. These are made of steel, are easy to handle, fix and do not bend if you slightly touch them with tweezers or something like that by mistake. I also painted the railings and other PE parts with the airbrush before further handling and fixing.
The Photoetched pompoms in my view were a little too large-- they will not fit on the kit platforms and another point is, that they look rather two-dimensional after one has assembled them (all 11 parts !!). I used the cast resin upgrades offered by White Ensign, and would like to thank Jim Baumann for his kind help regarding these parts. I had ordered them directly from WEM but they were not able to deliver them in time due to nil stock. Jim supplied these from his store.
The last main artillery turret had to be changed. The Nelson hat 6 Oerlikon platforms at my chosen period of time. The turret in the kit however only had four. I scratch built two extra platforms from a metal tube and mounted them after sanding etc.
I had a small problem with one of the pom-pom platforms during handling it - Ping the small part flew away and was not to be found again in the chaos of my modelling dump. So, what to do ? I was thinking and searching for an alternative and came across a memo board wall needle with a plastic grip which partly looked suitable and after grinding, shaping, sanding and painting was fitted in the right place. It looks OK to me, and if you dont know, youll not notice the difference.....!
The barrels of the light artillery in the kit were completely ruined and I therefore replaced them with very thin injection needles which were cut to size. The ones of the mid-size turrets were ok and I used them as they were. The barrels of the heavy artillery were drilled open at the front with a suitable size drill (and a lot of sweating!)
The crew is from Eduard, who provides a set of approx. 450 men on one grid, all ready painted. I placed about 50 of them all over the ship.
The anchor chains, which were on the kits deck were completely removed and replaced through small chains from a ModelRailway shop. The chains included in the PE set are useless in my view, being flat.- I had tried to bend them into shape- but could achieve a satisfactory result.I shall continue in the the future to use Model railway chain,- which looks very good to me and is easy to handle. The anchors themselves were from the PE set and were glued into place with superglue after painting and weathering. The kit plastic anchors out of the box were useless.
The ropes, which lie around of the deck were made with very thin copper wire which I pulled out of an old radio transformer. I wound it around a thick needle, flattened the coil with a pair of pliers and painted them with Humbrol paint N° 168 (hemp). After that they were weathered a little and glued into place.
The kits masts were entirely replaced with steel and the rigging was made using stretched sprue which I also used for the awning poles on the foredeck of the ship. This time I created the water with a mixture of lake-foil (ModelRailway accessory) and silicone, which I carefully modelled around the hull of the ship in order to get a bit of movement into to the water surface. A little bit of white paint was also applied to round it off a bit.
The weathering was done with powder colours which were strongly thinned down with matt varnish (Acrylic) and water, then applied to the desired places. The rust looks a bit bright on the photos, but it looks good in normal daylight.
All in all, this is very nice kit, with which one can make a very nice model with a little patience and using the above mentioned WEM PE-set.
