by Mike McCabe
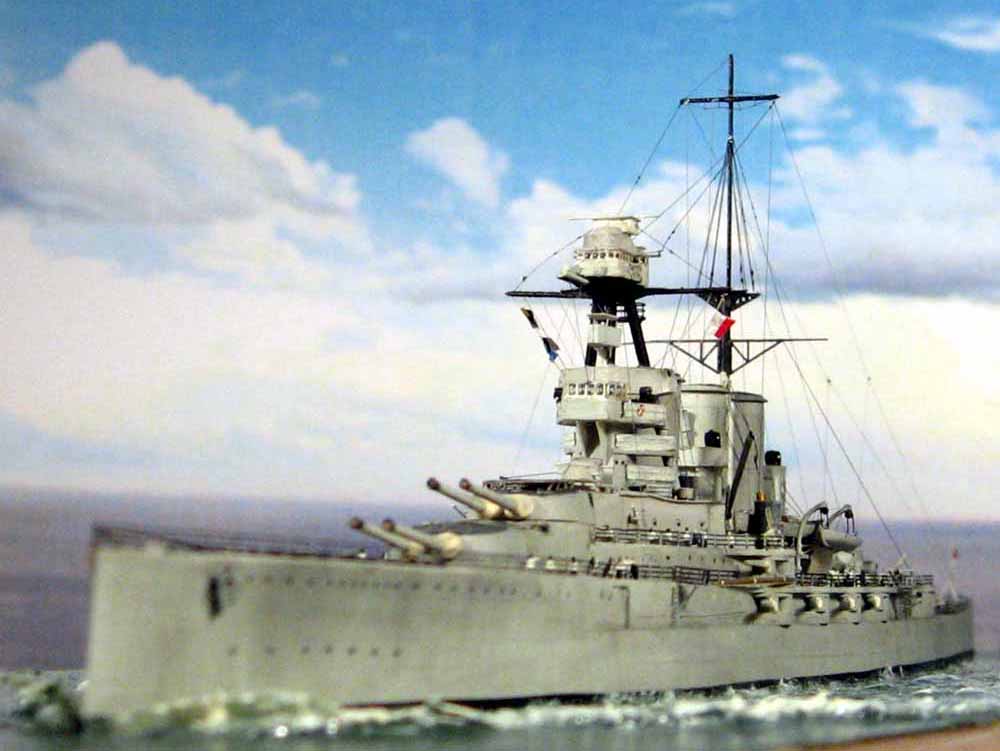
1/700 HMS Tiger, 1928 (Combrig)
As someone who usually builds smaller ships, destroyers and escorts mainly, largely from the Second World War or interwar period, a large battlecruiser of first war vintage is something of a departure. In this case I wanted a bit of a challenge, something different and also I really liked the look of the ship and the kit so decided to build HMS Tiger.
All the builds I had seen of this kit were pretty much out of the box, that is in the First World War fit. Although to many the look of the ship once the mainmast was extended and a fighting top added to the bridge was a change for the worse, I liked the more imposing look and decided to go with a later fit. Another important consideration for me was that in a First World War and early 1920s fit, the colour scheme would have to be Dark Admiralty Grey, which the Home Fleet wore overall at the time. Personally I really dislike this colour, for a 1/700 ship I find it much too dark, with a tendency to mask detail and really look, well, just wrong to my eyes.
Fortunately I came across some photos of the ship as she was in the late 1920s at the end of her service, when employed largely as a training ship. These photos showed a light grey scheme, which I much preferred, so it was a simple choice of building the ship as in 1928 with extended fighting top and light grey scheme. Some research using a borrowed copy of Burts Battleships of World War One showed that changes from the 1916 fitting as represented in the kit were comparatively minor. This mainly consisted of extending the bridgework, adding a flying off platform, slightly different fit and position of anti-aircraft guns, a new superstructure astern of X turret, extended searchlight platforms astern of the aft funnel and a few other minor details, but fortunately no major surgery.
After some further research and discussion with fellow MWers including John Werler, Laurence Batchelor and Joseph Reindler, I managed to get an idea of the most important component of the build that would have to be tackled, the oddly shaped fighting tops. Research didnt however prove complete, and some elements of the layout of platforms and supports had to be something of a hit and miss affair.
Since I mainly build smaller ships I made a mistake in fitting the main superstructure part of the kit, I painted this first then found that there was a gap around this part that needed filling, so ruining one paint job. All models are a learning process and I certainly learnt on this occasion that planning ahead is even more important with the larger 1/700 ships. The remainder of the process was pretty smooth however, though there isnt actually that much in the way of superstructure for First World War vintage ships in any case.
Turning to the bridge, I wasnt happy with the main bridge part in the kit which had solid windows, I scratchbuilt the extended main bridge platform and used 1/350 ladder stock and plastic card for a new bridge. The crew members manning this section are unfortunately not very visible in the end result. At this stage I installed the supports from brass rod and hit the problem that the odd v-shaped section astern and above this platform would be difficult to manufacture. Eventually the only way I could find was to fit a base of plastic card, build up the sides in site with card and backfill the void with white glue, trimming off any overpour with a very sharp scalpel when dry. In hindsight I think this was the best approach as attempting to fit the supports with this platform in place would have been extremely fiddly. Above this was another small gondola type platform, made of paper and ca glue, then a small open platform made of wire mesh, then the fighting platform above this was built of plastic card and paper, with again ladder stock for the windows to complete the new bridge works.
All the remaining new superstructures were a mix of plastic card, paper, carved plastic sprue and whatever bits of etch were suitable. The White Ensign etched brass Tiger fret was used for many of the remaining details, tompions are cut down wheels from their aircraft set, crew are Eduard figures repainted, all masts are replaced with brass rod, tapered at the end by filing on wet and dry paper. The boat deck was enlarged and paper wind shields added, rigging is stretched sprue and painting was with humbrol enamels weathered with washes and pastels. Sea is the usual acrylic gel with a bit of clear plastic pulled apart with sharp tweezers for the bow wave.
This was a very enjoyable if long build, mainly because I moved house in the middle of it and lost about three months. I would thoroughly recommend this kit, be careful of the main superstructure part but otherwise no fit problems and a very sharp piece of casting. The white ensign fret is essential and together I think the combination is a real winner.
Thanks to all those who helped out but particularly to John Werler for his encouragement and sharing information and ideas, I look forward to seeing yours soon John.
