by George A. Georgopoulos
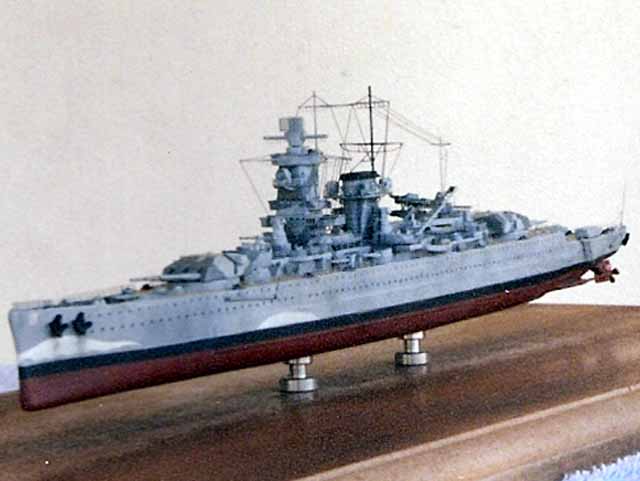
1/600 DKM Graf Spee (Airfix)
This was a sentimental build. I had built this kit in the mid-seventies as a teenager. It took me about two weeks to build back then, and afterwards I had endless playing hours with it. For some reason, after building the kit, the story of the Graf Spee sparked my interest in naval history. This time around, it took me a bit more than a year to build (what with the family and work and all) and the research preceeded the construction. Two very different builds about 30 years apart; each build quite fullfilling in its own way.
I attempted to depict the Graf Spee at the time of the river Plate, prior to the battle itself, as I did not model the battle scars. For anyone interested in depicting the Graf Spee at the time of the Battle of the River Plate, practically all of the pictures are concentrated in the deutschland-class.dk site, so most of your research is straightforward.
The kit itself has a decent basic shape, but is practically bereft of any detail in the vertical plain, with the exception of the Coronel plaque and the windows on the front of the Turm-Mast, the main superstructure element. The Coronel plaque is the only bit that was left intact as the windows are of the wrong shape.
But the main drawback of the kit are the relative muzzle sizes of the various pieces of artillery. The muzzle of the 4.1 inch guns is larger than that of the 11 inch guns, which in turn are about the same size as the 5.9 inch muzzles.
Then again, anyone building a mid-age Airfix kit should be prepared to face such difficulties. Indeed, I think the beauty of such a build is how to turn this old kit into a respectable model.
The dedicated WEM sets for this kit were used (Items 633 and 626), together with the WEM Arado plane (item 623). The PE sets were great and much of the final look of the model is due to the PE. However I believe there two issues with the sets. Piece 65, the main mast, would better be substituted by metal or plastic rod, due to the excessive thickness of its lower half. Piece 63, the main mast rigging, is not quite correct for the Montevideo look--the supporting bars are wrong. Both of these are easily fixed.
A final note on the Arado does not concern the product iself, but an incident that earns WEM credit for their service, so I believe it deserves mention. This product was supposed to come with a small PE set with the supports of the floats and a propeller; unfortunately WEM had stopped shipping the PE part, but neglected to correct the picture of the product in their web catalogue. So I opened the package expecting to find the PE fret and was distressed that no PE was included. I thought I had somehow lost it with the packaging. When I inquired with WEM they informed me of the fact that it was never shipped! I pointed out how the product is advertized on their site, and their reaction was to, very gentlemanly, refund me for the product, and make sure that the site reflected what was sold. So the undercarriage of the Arado was scratch built--that was actually fun!
Possibly what contributed most the appearance of the model is the addition of vertical detail in these two parts, especially the horizontal rails, which are actually stretched sprue wound around the structures. (Doing this with metal wire at this scale is beyond me.)
All of the engraved windows were sanded flat, and new rectangular windows drilled. That was an unnerving experience. Drilling the zillions of round portholes in the hull was a piece of cake compared to tackling these few rectangular windows. The covers for them are from scratch plastic. A lot of thinning of platforms and solid railings took place, as the thickness of these pieces is really out of scale.
Forward control station The effect of the slit windows here is not so evident in the finished product as the Turm-Mast is, but cutting these slits out was a breakthrough for me. The original piece has solid walls. The slits were effected as follows:
The piece was sawed almost, but not quite, in two with a horizontal incision from front to almost all the way back, at the height where the slits would be. A piece of plastic card was fitted in the slit, and cut to the shape of the control station walls. Then the shaped piece of card was extracted, and material was cut from its periphery where the slits would appear. Finally, it was glued in place and after putty application, was sanded to blend with the walls.
Searchlights These were fun to build, though I believe they look out of place on the model; I guess I went for the fun of developing technique at the expense of accuracy here. I drilled the place where the lense should be and painted the inside of the lense silver, adding a tiny drop of French blue before the silver paint dried; so the blue sort of blended with the silver but not all the way, sitting mostly in the middle. Then white glue was added in stages over a few days until the concave shape was effected. In retrospect, they look too pronounced and they should carry slits in front of the lense, but such a feat is beyond my skills.
Torpedo Tubes The ones supplied were too off the actual shape for my liking, so I scratch build them from scrap plastic and hypodermic needles. All eight tubes are made out of two needles. Sanding the metal tubes into the slanted opening was not as easy as sanding plastic, but you get the hang of it after a while; I found it is best done with a solid nail file, rather than with sandpaper. My only mistake here is that the two sets were not made at the same time, which resulted in a slightly different shape in the two sets. It is not so evident in the pictures, but I know the difference is there.
Forward deck area The kit has two engraved grooves for the anchor chains which are themselves engraved in the grooves. As these grooves are nowhere to be seen in pictures of this area on the actual vessel, they were filled and the wooden deck rescribed. Holes were cut through the wave breaker for the anchors to go through, following evidence in actual pictures. This proved tricky, as the holes went through the thin deck to keep the top of the wavebreaker intact. Thankfully, though three anchors were carried, only two chains appear on deck in pictures of the real ship. I think that adding a third chain would have made the wavebreaker holes unmanageable.
Cranes Here I took poetic license. The parts were extremely basic, and though WEM includes metal parts for the main crane bars, the plastic base still remains; and it is essentially a vertical rod. So I scratch built the base from plastic scrap and cable reels from the WEM kit, and scratch PE. I think they look out of scale, but give a more "busy" feel than the original parts. Besides, they were certainly fun to devise and paint. Another side effect was that due to their large diameter, the anti-aircraft gun directors were placed further forward than their supposed position.
Other parts The diameter of the 5.9 inch gun muzzles was reduced with sanding. The 4.1 inch gun muzzles and turrets needed more drastic measures. The turrets of these guns were reshaped to come closer to what the actual ones looked like. The muzzles were completely removed and scratch built from spares and hypodermic needle pieces.
All boats were given a generous sanding as they are supplied with a flat bottom and pins to attach to the deck. So I had to create the shape of the keel. The larger boats were given railings and portholes, while for the smaller ones my only means of salvage, besides giving them a keel shape, was the paint job. The small mast on the rear rangefinder is not inlcuded in the kit, so it was scratch build. The markings on the Arado are from leftover decals of the Trumpeter Bismark; no decals are included in the kit and the flag is from generic flag stock.
Another diversion from the actual vessel (and the Airfix instructions) is the fact that I only placed two boats between the funnel and the Turm mast, whereas there should be three. Unfortunately, their size is such that the railing at this deck level could not be fitted if there were three of them side by side, and I opted for the uninterrupted railing over accuracy here.
The cable reels were made as described in my entry the tips and tricks forum, under the heading "cable reels", although the effect is not so strong as it was in 1/350 scale.
Finally, I found the small antiaricraft guns too crude for the look of the model and substituted them with semi scratch built ones from spare parts. Although inaccurate (I think the parts came from US warships) they were fun to put together and challenge to paint.
The model is mostly hand painted with the exception of the hull and railings. The superstructure actually has three shades of grey, and with all the details extruding, masking and air brushing would be too hard for me.
The deck was given a base color and then individual planks were touched up in freee hand with various lighter and darker shades on that base color. A soft dark brown pencil was drawn over the raised borders between the planks to outline them better. Pastels were not used on the deck, as at this scale they would dilute the individual plank look. It is kind of sad that the effect is only barely in most of the pictures.
Pastel dust was used to effect the grey shades on the sides of the hull. These are evident in the Montevideo pictures. The bow crests were hand painted. So was the Arado, but the two shades of green camouflage came off too dark in the end.
Every build has its own accident. Mine came when I left the eight turrets of the 5.9 inch guns to dry after wet sanding them and the cleaning lady threw them out. I cannot blame her, as these tiny pieces look like scrap to the uninitiated; I should not have left them exposed to dry.
To my rescue came EPinniger of this site's forum, who answered my plea for help, and was willing to part with his "old, battered" model in exchange for other parts. Thanks to him, my build was completed with no further incidents; plus my 8 year old son is now the proud owner of the old battered model, fitted with turrets of a 1/700 Revel Independence carrier in place of the actual ones. Many a ship battle has been fought in his room since...
I think that this is my only build in which turrets were added after rigging was complete.
Minor accidents occurred during the outdoors photo session. It was windy and the flag came off (you can see it is missing in some pictures) and I knocked off the small mast at the bow! Pictures were taken with my old, all-manual OM-1, on a tripod, with an aperture set at 22, and scanned at a later time. I guess I could have done a better job of them; I was too close for the diagonal shots to keep the whole image in focus, among other things...
As this is my first entry in the gallery, a word of acknowledgement is in order. I have been following this site for some time now and have been a beneficiary of ideas and techniques of people with more advanced skills than mine, while making only a meager contribution. So I would like to thank all of you who help me develop my skills further and enjoy this hobby.
