by Dirk Ponge
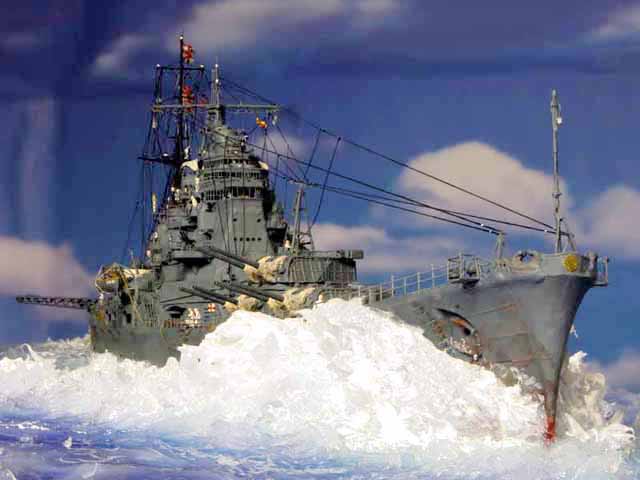
1/350 IJN Chokai (Aoshima)
One of the most impressive classes of heavy cruisers was the Takao class with a massive castle like bridge structure. This 10-story bridge was one of the reasons which led to the top-heaviness of these cruisers. Therefore, the bridge of Takao and Atago was later reduced in size and torpedo blisters were added to the hull to improve stability. Maya and Chokai were not rebuild in this way and especially Chokai kept the initial appearance of the Takao-class. Chokai was on my top list of favorites and when the correspondent Aoshima kit in 1/350 was introduced I did not hesitate to get one.
A lot about the history of Chokai can be found in the internet. Here I want to give only a few details of the building process.
I got the kit from Aoshima in October 2007, when it was very new on the market. It took some time until the first PE-sets for Takao-class cruisers appeared. I started with painting the linoleum deck with WEM IJN 10 Linoleum. I masked the individual brass strips with thin tape and painted them with a brass color. This was a very slow and tedious process because a lot of ventilators, hatches and other detail were in the way. The next time when I start with the Aoshima Atago kit I will first remove all the ventilators (a very weak point of the Aoshima kit because the ventilators are simplified as cylinders) before masking. Later I substituted some of the ventilators by aftermarket products like Fukuya Nagato Mushroom Type Funnels, Voyager 1/350 IJN Ventilators and from the Hasegawa Japanese Navy Ship Equipments Set A.
I used mainly parts from the WEM 1/350 Takao/Chokai PE set (the only set with bridge windows for Chokai and parts for Chokai's main mast) and later also parts from the GMM Takao sets (very nice railings).
The supports of the foremast appeared a little bit to thick and clumsy. I cut them away and used steel needles instead. It is always not easy to do such an operation when the mast is already built completely.
During the building process I employed a lot of LionRoar's WWII IJN Perforate Bars and Triangular Perforate Boards. Most of them are for 1/700 scale ships but I think they can be used without problems also for 1/350 scale models.
I removed all fairleads and substituted them by resin parts (Corsair Armada CAP 350-002, 1 x Generic Chocks) which are meant to be for battleships. However, a comparison with the plan of Takao's typical fairlead in the book of Skulski showed me that they are perfect in size and shape. I bent some of them in hot water so that they follow the curvature of the hull.
The turrets are from the LionRoar Takao set and have already very nice blast covers.
Later in the building process Voyager IJN ship boats became available which are very nice. I used Voyager 9 m Cutters, an 11m Motor Boat, an 11m Motor Pinnace and 12m Motor Launches from the Hasegawa Boats Set A. The original Aoshima ship boats of the Takao-class kits don't show much detail and are another weak point of these kits.
For the Jake and Pete float planes I used the PE-parts for the cockpit frame from the Lionroar Takao set. This is really a good idea to include such a part in a PE set and in the new Flyhawk/Veteran models kit there are even better cockpit frames (I wonder why WEM, GMM and Tom's Modelworks never had this idea.). The Flyhawk/Veteran kit seems to be incredible good. Unfortunately, it came too late for my model of Chokai. I will use it later for my Atago model.
For the first time I used cotton flags from ModelFlags.com (J02 JAPAN Naval Ensign and J21 JAPAN Vice Admiral's Flag, both in size AA).
Mistakes in the model: I should have added a degaussing coil and maybe Chokai was not equipped with a Jake and a Pete already in 1943.
For the water I used again the silicon method which is described in detail by Frank Spahr on. http://www.modellmarine.de/phpwebsite/index.php?module=pagemaster&PAGE_user_op=view_page&PAGE_id=143&MMN_position=228:228
This is a German modelling website. It is only in German but the pictures are quite clear. Maybe you can use Goggle translator or something similar to translate into English. Together with the pictures I think this is a good stage by stage instruction. After painting the base with acrylic artist colors I used transparent silicon rubber to form the waves. I painted the crests afterwards with white color.
Some comments: If you buy the silicon you should take care to get the transparent type. There is a version with acetic acid which I can not recommend (Your room will stink for several days (vinegar)). The other type (neutral) is better (practically no smell).
For nearly all the pictures I used Helicon Focus which was introduced on this page by John Leyland (Thank you John for this very good tip.). I finished everything at the end of July 2008 after a building time of 10 month.
