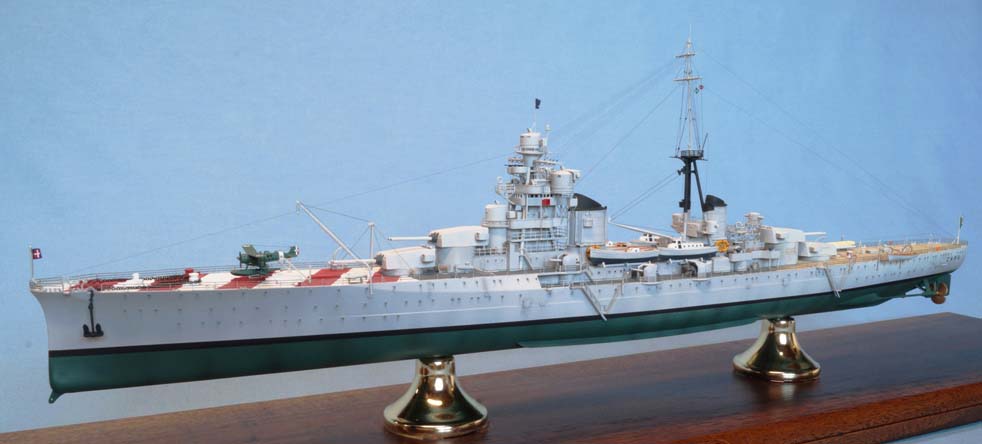
1/350 Italian Navy heavy cruiser Zara (Trumpeter)
|
by Chuck Bauer |
1/350 Italian Navy heavy cruiser Zara (Trumpeter)
This is my rendition of the Italian heavy cruiser Zara, as outfitted in March, 1941.
I was quite happy with this recent 1/350 kit from Trumpeter, no. 05347. The plastic parts are crisply molded and they fit well. In addition, the kit comes with four frets of photo etch parts, including railings. You could build a terrific model out of the box if you wanted to.
I opted to go a step farther, making and adding details that I did my best to replicate from archival photos on the internet. In addition, I made good use of Steve Wipers Warship Pictorial No.23 Italian Heavy Cruisers of World War II.
As I said, I loved the kit, but I did have an issue with the photo etched metal deck railings. To my eye they seemed over scale, by about a scale foot. So I opted to make my own railings, using PE inventory that I preselected to get the correct height. This process allowed me to cut and fit the stanchions and cables needed to straddle the numerous chocks on the top edges of the hull, and in particular, the anchor chain openings on the bow.
At first glance I was very pleased to see the leadsmans platforms molded into the hull. But the more research I did, the less confident I became that the ship actually had them in 1941. Furthermore, the kits railings had no provision for them, which troubled me because I didnt really want to run the deck railings past where the platforms met up with the main deck of the ship, essentially blocking their entrances. Nor did I look forward to cutting up the kits railings and trying to make pieces to go around the outboard surfaces of these platforms. My research turned up two possible solutions: One possibility was that the platforms were removable and thus not visible in any of the photos I had seen. The second possibility was that they were part of the ships original equipment but were removed at some point during the war. I was inclined to believe the latter, but for modeling purposes it made no difference. I concluded that a modeler could snip them off and not give them a second thought. However, by the time I came to this conclusion, I had already made and attached railings to these platforms, using my own PE material. The good news is that by using my own PE it was relatively easy to cut and piece things together so that I ended up with stanchions placed on the corners of the platforms. To make a long story short, my rendition shows how those platforms would have looked in place, with railings around them and access to them from the main deck of the ship.
The color schemes on these Italian vessels during World War II were very interesting, most notably the rosso matone (brick red) identification stripes on the bow and the dark green verde scuro antivegetativo lower hull color. The yellow and red life rafts were another curiosity and were fun to reproduce. The legno chiaro teack (light teak wood) decks were painted using the plank-on-plank masking technique and an Olive artists oil pin wash.
I used a variety of enamel and acrylic paints on this project, sourced from Lifecolor, Testors, Model Masters, Tamiya, Polly Scale and Vallejo. In total, I used 56 different colors, plus some custom mixes. I used three different washes for shading and detailing. These were made with mineral spirits and artists oils, from Ultrecht, Winsor and Newton, and Royal Langnickel. I decided not to do any weathering on the model, so I had no need for artists chalk pastels.
For the rigging I used a combination of Ngineering Ultra Thin stainless steel model railroading wire, Modelkasten .06mm (.0023 inch) and .07mm (.0027 inch) nickel titanium rigging wire, and Caenis 20 Denier monofilament fly fishing line.
The ships flags, aircraft markings and graphics on the No.4 turret came from Mr. Giampiero Galeottis website, Regia Marina M.A.S., which is a sponsor of Modelwarships.com.
Construction notes
I replaced the kits jack staff and ensign staff with scratch-built tripoidal assemblies made from wire. The ensign staff also includes a rear-facing running light.
On top of the forward superstructure I added a flag staff, made from wire, to match historical photos.
I drilled out the portholes in the utility boats, filled them with Micro Scale Kristal Clear, and added brass props.
The IMAM RO.43 floatplane was detailed with photo etched wing braces and a prop. I also made a machine gun for the rear seat from stainless steel wire and added rigging made from Modelkasten wire. The decals came from Regia Marina M.A.S.
I added hooks and cables to the large aircraft crane and the smaller hoists that are installed on the bow. (The hooks on the small hoists are shaped pieces of copper speaker wire.) In addition, I used wire to create the ropes that were used to stabilize the crane when it was hoisted into position.
The red and green navigation indicators hanging from the mainmast yardarm were carved from inventory PE and positioned to match reference photos.
To achieve a more realistic look, I replaced all the kits rope and cable reels. The spools were made by wrapping copper wire around a styrene mandrel and then gluing the spool into a photo etched metal frame.
The paravane carts on the bow were scratch built and placed near their respective hoists, thus matching reference photos.
The canvas tarp on the stern-mounted boat was made with tissue and thinned white glue. The boat cradles came from inventory PE.
I added A-Line metal anchor chains, sourced from my local hobby shop.
The awning supports on the stern were made by piecing together some inventory PE parts and positioning them to match ships drawings and archival photos.
I made and attached an all-important slop chute from scratch, replicating it from archival photos.
The navigation lights on the sides of the forward superstructure were made from inventory PE, cut and formed to match historical photos. The lenses are clear styrene, painted with Tamiya Clear Red and Green.
I made orange ring buoys from a WD40 nozzle and placed them in historically correct locations.
The hanging boat on the stern is actually hangingits not glued to the side of the hull or to the ends of the davits. The steadying ropes were made from wire.
As mentioned earlier, I set the kits deck railings aside and made my own, from inventory PE frets.
Summary
When finished, the model contained 394 plastic and photo etched kit parts, plus another 372 pieces I added on, either from aftermarket PE inventory or by scratch building. Thus, almost half of the parts in it did not come in the box. Ive included some brutal close up images to try and show some of those details.
The model took 518 hours to complete, surprisingly low based upon my past experience with similar subjects.
