1/700 Soviet Project 69 Cruiser (Poseidon)
|
by David J. Salvin |
1/700 Soviet Project 69 Cruiser (Poseidon)
As a response to the German Scharnhorst-class battle cruisers, Stalins government had also ordered three battle cruisers that were laid down in 1939 and were designed to mount nine 16-inch guns.The Kronshtadt-class battlecruisers, with the Soviet designation as Project 69 heavy cruisers, were ordered for the Soviet Navy in the late 1930s. Two ships were started but none were completed due to World War II. These ships had a complex and prolonged design process which was hampered by constantly changing requirements and the Great Purge in 1937. They were laid down in 1939, with an estimated completion date in 1944, but Stalins naval construction program proved to be more than the shipbuilding and armaments industries could handle. Prototypes of the armament and machinery had not even been completed by 22 June 1941, almost two years after the start of construction. This is why the Soviets bought twelve surplus 38-centimeter (15.0 in) SK C/34 guns, and their twin turrets, similar to those used in the Bismarck-class battleships, from Germany in 1940. The ships were partially redesigned to accommodate them, after construction had already begun, but no turrets were actually delivered before Operation Barbarossa.
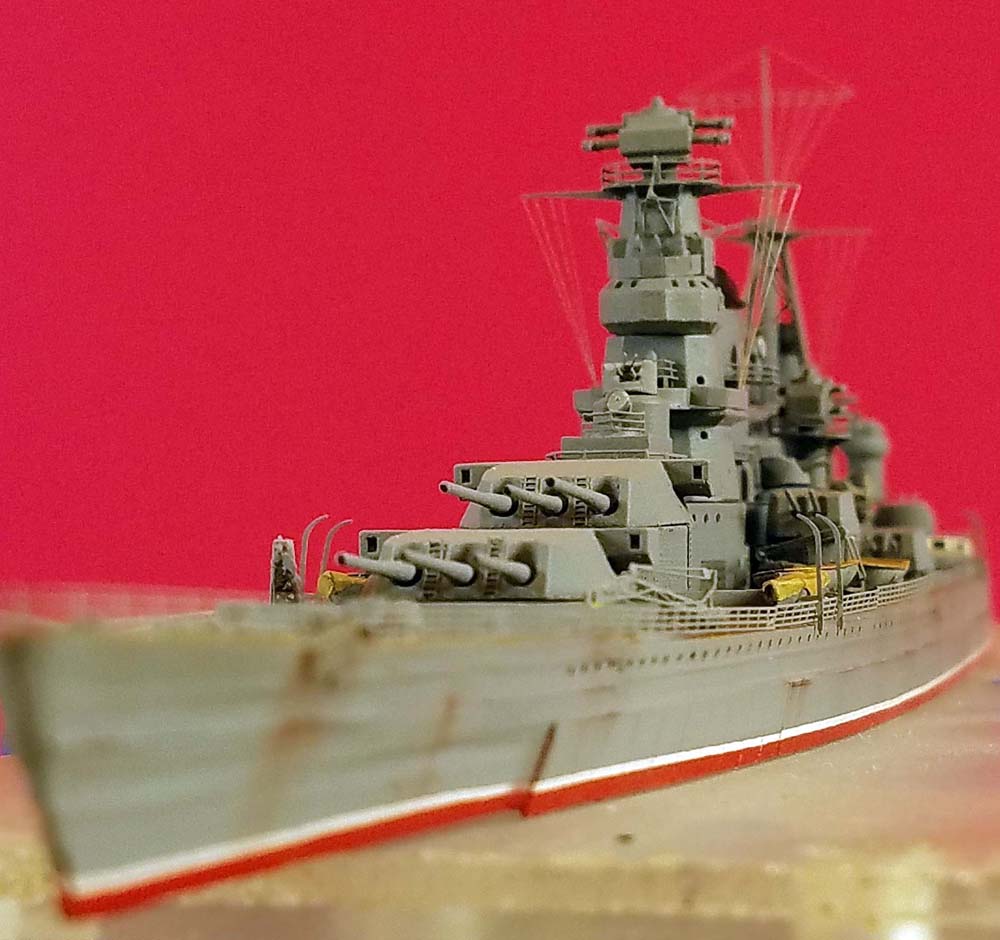
This most unusual kit comes compliments of my favorite patron, and is perhaps, the most difficult ship kit I have done in my 30+ years of modeling. As can be seen in the photos, the kit comes with no hull. Just a number of rather heavy PE frets with individual bulkheads and outer hull plates. Kit designers apparently expected the modeler to put all the bulkheads and plates together to create a hull. However, the hull plates do not overlap but rather butt join. Meaning even the slightest mis-alignment means gaps, bulges and/or warps in the hull. This makes for a rather difficult road for the modeler since the outer hull plates each have to be bent around the bulkheads, and securing a bent outer plate to a thin PE bulkhead is not easy. This is why the kit calls for the modeler to use putty or other filler to fill in the chambers of the hull to have something to glue the outer hull plates to. (I used AB putty BTW) This, in turn, requires filling and sanding multiple chambers while trying to preserve the shape and lines of the hull. About half of the build time for this kit is put into making a hull which is, of course, merely the starting point for most kits. In my opinion, I would have rather just have had a resin hull to start with.
On the other hand, the solid PE deck and deck plates make for exquisite detail not possible in resin molding. On the flip side, however, this means the entire hull is brass and thus very hard to get acrylic paints to stick to (even with enamel primer).
Also as a result of the unusual full PE deck which comes dead flat with nothing molding to it, it means that the modeler must build and attach every protuberance from the hull including hatches, bollards, vents etc. While this makes it easy to get crisp paint lines as you are pre-painting and attaching all the items, the kit makes getting a perfect result rather difficult. The bollards for example are just a flat plate with two holes in them into which they expect the modeler to place two stems to create the vertical part of the bollard. But its rather difficult (and tedious) to get two stems the identical height, width and orientation over and over all over the deck. The upside however, is that we get to have deck hatches which can be modeled in the open position. Something not often seen on 1/700 scale kits.
Anyway, the kit is very well executed. The PE deck has shapes and markings for the placement of all superstructure parts and all other items to be attached to the deck. The instructions are beautiful full color pictographs making assembly straight forward.
The PE for this kit is thick, and easy (and forgiving) to work with. Upper decks come with PE railings already attached and ready to fold up into position. Unfortunately, as a result, the upper railings are too thick to be in scale. Surprisingly a kit so rich with PE does not include any railings for the weather deck. I added the much more properly scaled railings from after market Flyhawk PE sets.
Also inexplicably missing are any masts or tubing for mast supports and the like. The kit just tells the modeler the diameter and size of the wire needed for the task (presumably assuming the modeler has 3 or 4 different diameter brass rods lying around) OK, I build so many kits that pull this, I practically by them in bulk, but.... from a kit design standpoint, I hate it when kits expect the modeler to have specific wire or tubing to complete (not merely augment) but to actually complete what is supposed to be a kit. I prefer JAG kits where they actually supply the builder with the exact diameter rods and poles called for in the kit.
Also missing in the kit are anchor chains and anchors. I added 40 link per inch anchor chain.
What was NOT missing in the kit are extra parts. I LOVE it when kit designers supply a few extra parts especially when the parts are small, hard to put together and/or pivotal to completion of the kit. My kit came with extra barrels for the main armament as well as for the secondary and AA guns. A very nice touch.
Another feature I like was the use of PE for complicated radio cable rigging like that from the main superstructure to the smoke stacks. That type of rigging if done with stretched sprue for example would be VERY difficult to pull off, and even if I did, would not be perfectly symmetrical as the PE is. Sure, its over scale - but so are the upper railings.
Overall, for those adverse to working with PE, dont get anywhere near this kit. For those looking for a new and unique PE challenge - step right up. Ive seen the kit on Ebay for about $90.00. For that price, you get a real challenge and a larger than usual number of hours of building enjoyment. Whats more, since this ship was never actually built, we dont know what they would have looked like, so there are no wrong answers as to colors or rigging etc.
