by Timothy Choi
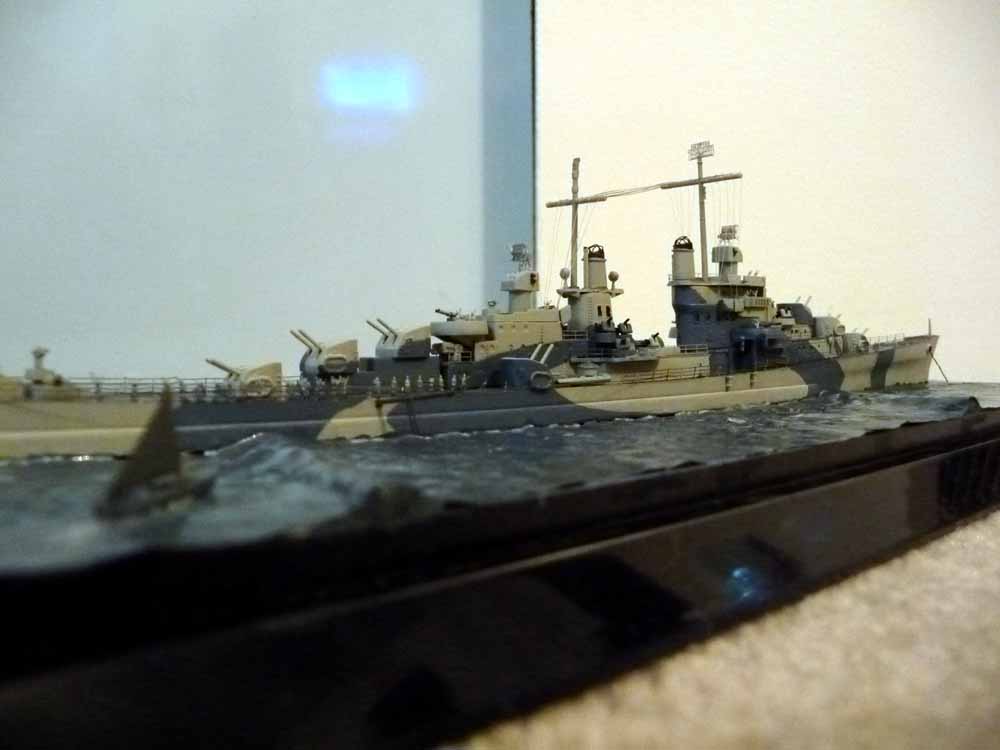
1/700 USS San Diego 1944 CL-53 (Dragon)
This is the Dragon San Diego Premium Edition kit (purchased for CAD $19 at a hobby show two years ago) and attempts to portray her sometime between April 1944 and the end of the war while she was wearing her dazzle scheme. It took me around three week to finish due to the self-imposed requirement that it be completed in time for Dec. 31st 2009 so as to be able to be given as a present to a friend. This constraint resulted in several ommissions that I otherwise might have addressed.
This was my first time working with 1/700 PE, and now worship those 1/700 masters even more!
Changes and Stuff!
Several modifications to the kit and instructions are necessary to accurize the kit, some of which I did, others I did not. San Diego is one of the best documented vessels in terms of clear photographs on NavSource, which certainly helped in this regard.
The main changes include using part A2, the "stepped bridge face", in place of part A3, which is what the kit tells you to use. Accordingly, due to the radii differences of the stepped and non-stepped pieces, one should use part A22 instead of A25 for the open bridge, but I did not notice this need until well after completing the bridge assembly. Furthermore, one should correct A26 and A27 (the windbaffle area should run all the way back to the flag bags and the two curved portions should be flat), but I did not have the skill to do so convincingly and left them as they are. In accordance with photos on NavSource, I added a splinter shield around the "step" and around A25's curved front using paper. To further detail the open bridge of A25, I added extra strips of paper for making the splinter shields and added various scrap plastic for the bridge equipment and sky-lookout positions. I also drilled out the portholes on the front superstructure.
Other changes that are necessary focuses on the searchlight positions, particularly the platform around the rear funnel. The port/starboard positions of A23 need to be removed and an extra search light added to the rear of this piece.
One change that I did not notice until after giving the model away was that the bridge 40mm should be twins, not quads. D'oh!
Also, most of the portholes on the rear superstructure should be filled in, but this was not done due to time constraints. Also, the hull suffers from an oversized armour belt and incorrect knuckle at the bow, but I left these alone due to the time limit.
Part A36 (whatever it was supposed to be) was replaced with a pair of 5" practice loaders, made from the 5" single open mounts on the K sprue (Thank you Dragon for so thoughtfully including the many extra parts!). In accordance with the suggestion made by Michael Potter in the Calling All Atlanta Class Fans thread on the forum, I made a small cave in the bulkhead of this area, which is not really visible at all once everything's completed!
The instructions call for the modeler to use the old B sprue parts for some of the fittings such as the twin 40mm and optical directors, but I chose to use the better K sprue parts instead. The twin 40mm was made by cutting the quad 40mm and putting the gun on top of the B sprue base.
I also added two extra 20mm positions on either side of the funnel using the kit's parts meant for the 20mm on the rear deck. The rear deck 20mm splinter shields were thus made from scratch. A 20mm tub also needs to be added to the front of the bridge.
PE radars were from Lion Roar's US Navy I set to replace the less detailed parts in the kit.
Figures were from Mr. Hobby's IJN sailors set, which is actually produced by Eduard. The fact that my hobby store imported it from Mr. Hobby in Japan rather than getting the original set from Eduard meant that by the time it got to our shores, it had become quite overpriced - again, lack of time meant I had to take it or leave it.
The funnel tops were replaced by electrical wire...did not turn out as good as I had hoped!
The hawsepipe openings on the hull were made with a piece of plastic in which a hole was drilled and then cut around the hole to result in a small donut - again, if time had allowed, the outer edges would have been sanded smooth. The anchor chain is braided electrical wire.
I was quite impressed by the PE railings that were included. Their fineness compares well with offerings from aftermarket producers and are superior to most other PE frets included in 1/700 kits (at least, from what I've seen in photo reviews!).
The 5" duals were very nice, though I had to remove the nice gun captain hood on the tops as San Diego's did not have them.
Paints used were PollyScale's 5-O Ocean Grey and 5-L Light Grey, along with Gunship Grey for the decks.
The boats used were the ones on the K sprues. The one on the water was given a small styrene foredeck and a paper sail attached to a piece of stretched sprue. A tiller was added using electrical wire.
Boat boom was a piece of styrene rod. Ladder was cut from the kit's PE SC-2 radar.
Rigging was UNI Mono monofiliment for fly-tying. The bad thing about it is that it cannot be tightened using heat. The sagginess of the middle 4 horizontal runs was the result of the outer runs being pulled taut (the outer ones being the ones done last).
The Water!
Overall, this was an attempt to emulate Jim Baumann's water method, replacing three things: watercolour paper with crumpled regular paper (no time to get watercolour paper!), oil paints with acrylic paints, and titanium white with regular flat white paint.
The structure of the water was done by crumpling a piece of regular paper several times. Toothpicks were then laid on the base to represent the swells, making sure to place one of the toothpick's ends were the ship's hull would be. I then glued the paper over this.
The ship was then glued into position.
I then painted the area around the hull with Gunze Sangyo's Dark Green for IJN Aircraft before painting the whole base with that colour. Then, while it was still sort of wet, I overpainted it all with Gunze Sangyo's Intermediate Blue, trying to make the green and the blue blend with subtle differences. I used acrylic gel to cover the waterline where the ship meets the water.
Future was then used to give this surface a nice gloss sheen.
Flat white was then used to highlight points on the water and the waterline. More Future was put on this.
Drybrushed silver was then used to give the water a slight glitter under certain lighting conditions.
