by George A. Georgopoulos
1/600 HMS Ajax (Airfix)
As I was browsing this forums gallery I came across Felix Bustelos build of HMS Ajax in a dazzle camouflage. I was hooked.
This build is not historically correct, as I did not bother with all the meticulous modifications that Felix Bustelo did (for example, when this camouflage was carried, the plane and catapult had been taken off). I just went for the camo. Here are some of the things I tried on this build.
I have seen samples of a technique where individual planks are masked off and sprayed with slight variations of the deck color to a very nice effect. However, the examples were from 1/350 battleships or 1/700 aircraft carriers, where you have some room to apply masking. I for one do not have the skills to mask off individual planks of a 1/1600 cruiser. It may be doable on the bow or stern areas of the deck, but not in the confined spaces around or near superstructure parts. But I liked the end result, so I attempted a variation.
The deck was sprayed with a base deck color. Then I hand painted 0.5cm stretches of individual planks with a number of darker variations of the base color (adding brown, yellow and red). The result was initially awful. No matter how steady my hand was, variations in the pressure of application, the consistency of the paint and a little sideways motion of the brush made the darker streaks uneven, and not exactly rectangular in shape.
However, to the rescue came the lighter shades. Hand painting the lighter shades in the "planks" that are adjacent to the darker paint strokes made previously, covers up the "mess" and the illusion that you are viewing rectangular planks becomes more convincing. I also found that going over the darker strokes with diluted lighter shades, tones them down nicely. All of the painting at this stage was touch-up. I mean, in order for the individual plank effect to appear, no other weathering was applied (like washes or pastel powders). I just went over the raised deck lines with a light touch of a dark brown pencil. I liked the whole affair, though next time I will try a darker overall tone.
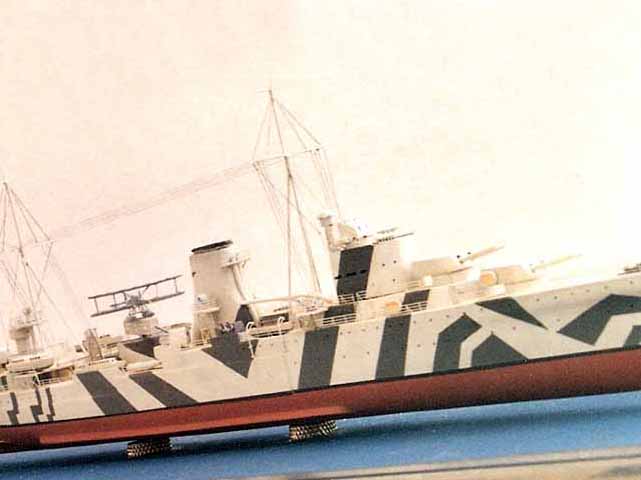
After painting the deck, I masked it off and sprayed the superstructure and the hull with the base grey color. Then I made an enlarged copy of the camouflage pattern from Alan Raven's Camouflage Volume One: Royal Navy 1939-1941, so that the length of the ship on the copy matched the length of the model. I seucred the copy under a transparent piece of plasticard and then stuck a piece of wide tamiya tape on the plasticard to cover the length of the ship's hull. The tape was wide enough to cover the height of the hull plus some of the superstructure. It was also transparent enough for me to see the ship outline and the camouflage pattern underneath.
Then I took a pen and ruler and drew the waterline and the main deck outlines on the tape. These marks allowed me to align the pieces of tape I subsequently cut off, as I stuck them on the model. In other words, as I would stick the pieces of tape on the model, I would take care that the waterline and/or main deck lines that I had drawn on the tape, aligned with the model's coresponding lines.I think that this little "aid" contributed a lot to the success of transferring the pattern on the model.
Then the cutting began. Zillions of little pieces of tape were cut off with the help of a razor and metal ruler, and stuck on to the hull side and the superstructure. I mean it felt like zillions. It took me five sessions over three weeks from the time I started masking off the deck to finishing the masking completely.
And then, there it was: A yellow blob of tamiya masking tape, exposing only the areas where the dark camouflage patterns would be. It looked really outlandish! I remember looking at it and thinking: Now what? How do I make sure that it is all sealed properly? And what will happen when I start peeling the tape off after it has been sitting for an average of a week and a half on the model?. There was of course only one way to find out. Out came the airbrush and short order was made of painting the dark color of the camouflage.
The next 20 minutes rank among the most memorable minutes I have spent modeling. That is how long it took me to lift all the little pieces of tape with a pair of tweezers. I can still recall the thrill, as with each piece being lifted the pattern unraveled a bit more, and seemed intact. (Well almost; there were a few blemishes, but they were easily correctable.)
This was a first for me. I know they look out of scale, but I was preoccupied with getting the technique down. The basic material used is black lettra set strips; at least that is what we call it in Greece: the kind that comes on a sheet of paper that you place on a flat surface and press on it for the strip (or letter or number) to come off the paper and stick to that surface. They are available in shops that sell stationery and office supplies.
Now I could not do this type of transfer directly on to the boat's bulkheads and succeed in the strip being aligned parallel to the deck, as the space is confined, narrow and curved. What I did, was I pressed a piece of black strip off the sheet on to the surface of my desk, added a drop of water so that it would stick via capillary action to a toothpick. Then I picked it up with a toothpick, placed it on the boat's bulkhead, aligned it, and let it dry. After that, the bulkheads of the boats had black strips on them. I proceeded to paint the narrow vertical stripes of grey with a small brush, so the black strips turned to windows.
The technique guarantees the horizontal alignment of the windows. The uniformity of the width of the windows, (effected by the grey paint on the strips) is something I must practice on!
Now isn't this ugly? I do not know what got over me and I did it like that. Bad colors, bad pattern, bad, bad, bad... I will have to redo the plane.
There is not much else to tell on this build. The model is typical of a relatively early airfix kit, and needs considerable work to acquire a busy look. Here is some highights:
The dedicated WEM PE set was used, and the build took me a year to finish (yeah, I only manage to build one of them per year).
The model received a bronze medal in the November 2007 Pegasus club modelling contest in Thessaloniki, Greece.
Updated May 2008- Updated images start on Page 2.
