by Robert Apfelzweig
1/350 USS Essex CV-9 (Trumpeter)
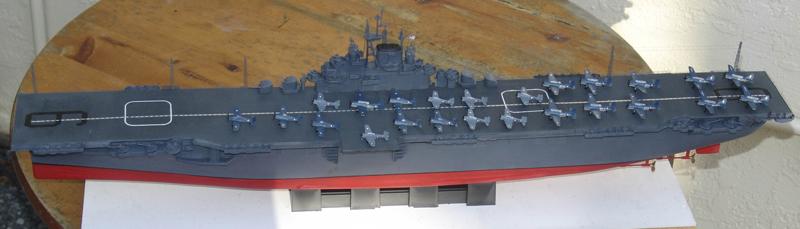
This is my build of the first of the great Essex-class aircraft carriers, CV-9. This model depicts her as she would have appeared earlier in her career, during most of 1943, with a uniform 5N blue hull and superstructure (WEM Colourcoats), near-black 250-N flight deck (made from a mixture of Tamiya paints, mostly dark Sea Blue; having a sample of the actual US Navy paint/stain chip helped a lot) and original radar fit (as far as I could tell from my available sources). This model was built on commission for a friend, who provided the air wing of TBF Avenger torpedo bombers, Hellcat and Corsair fighters (which would have been on Essex-class ships by late 1943), and Dauntless and Helldiver divebombers (the Curtis Helldiver SB2C's also being late 1943 arrivals). The kit I used came with the GMM Essex photoetch set, but not the Essex Plus set, so I had to add all the gun shields and accessories for the 20mm Oerlikons, 40 mm Bofors and the railings on the open-mount 5-in. 38 guns from spare brass photoetch (after building over twenty 1/350 ship kits in the last 4 years, I have quite a collection of spare parts now). I prefer my ship kits to have rotating main batteries (and secondaries, where possible, on battleships), so it was not too difficult to engineer the 5-in. dual and single gun mounts to rotate. The kit was a fairly easy build but I had some minor fit issues with the 3-part flight deck, requiring some putty filling of gaps and consequent sanding. The upper and lower hull halves fit together quite well. I tried using an airbrush with Tamiya flat red for the red lower hull but finally ended up just covering it over with a can of Testors flat red spray paint; the latter can be accomplished in about 15 seconds. Another problem was the decal set; I don't know how old this kit is, but the decals for the large number "9" at each end of the flight deck and the white outlines for the in-deck elevators partly disintegrated once placed into water. Re-assembling them on the flight deck was rather like putting together a flimsy jigsaw puzzle and I had to use flat black paint some sections of the numbers where gaps remained. Once the water had dried, the decals curled up and refused to adhere to the painted plastic (a problem I also had with the airplane decals on their curved fuselages), so I surmounted this problem by "painting" over, and sometimes under, them with water-diluted white Elmers glue.
