by Ed McDonald
1/350 USS Fanshaw Bay CVE-70, 1944 (Yankee Model Works kitbash)
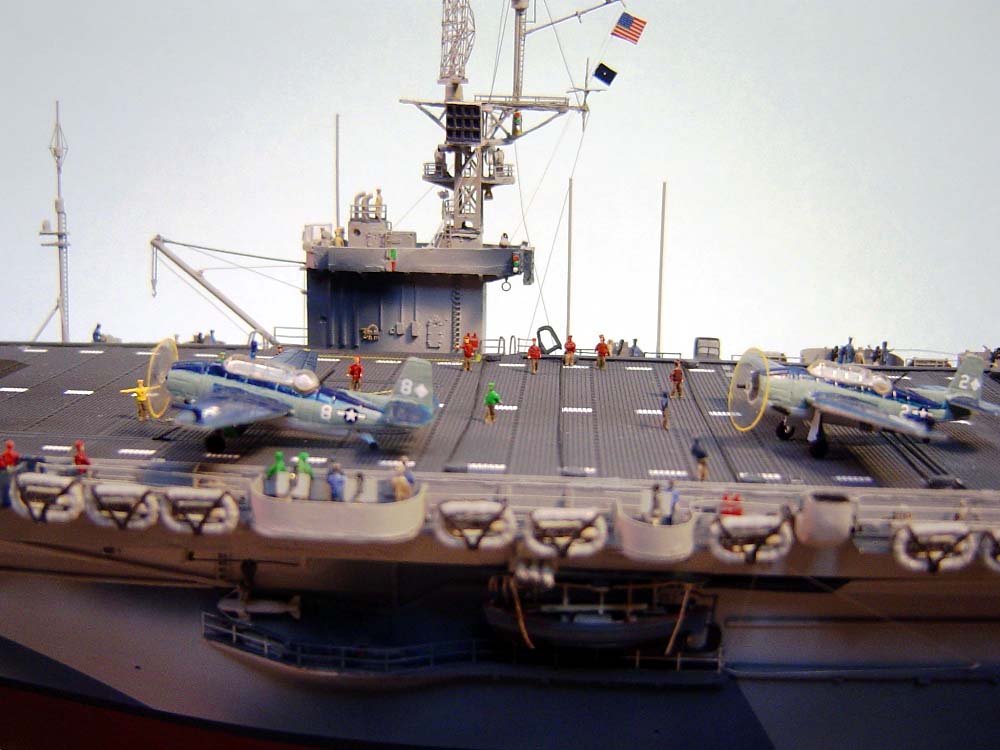
This is a nearly scratch built USS Fanshaw Bay (CVE-70), flagship of Taffy 3, as she appeared at about 0745 on the morning of 25 October 1944 (Philippine time) at the Battle off Samar.
My father, Lt. Edward D. McDonald, served aboard Fanshaw Bay as staff communication officer for Admiral Clifton (Ziggy) A. F. Sprague. Admiral Kuritas huge fleet had been sighted on radar (and doubted) at 0646, by an American pilot on anti-submarine patrol (and doubted) at 0647, by shipboard lookouts (and doubted) at 0648 but by 0649 incoming near misses pretty much removed all doubt. At about 0745, my father was on the forecastle of Fanshaw Bay supervising a work crew that was tossing all the classified documents, equipment and code books overboard. By that early point in the battle Sprague had already concluded that it was, in the end, hopeless. At 0750 a Japanese shell (6 inch non-armor piercing probably from cruiser Tone) hit the forecastle, severely wounding my father and killing or wounding several other men. A large fragment of that shell entered the right side of the back of his neck just below his skull and exited through his right cheekbone. It was a near miracle that he survived and, thus I can say that I was very lucky to have been born four years later. Curious how that works. My father passed away 10 years ago. This build is a small tribute to his sacrifice and to that of the other sailors of the magnificent Taffy 3.
During the war, 50 of these small Casablanca class 32 plane escort carriers were built by Kaiser Shipbuilding in Vancouver, WA. That amounted to 1/3 of all the aircraft carriers the US built during WW2! As the story goes, Henry J. Kaiser met with President Roosevelt and convinced him that smaller carriers were better since when (not if) one was sunk, a smaller portion of the total fleet capability was lost. They were cheap and easy to build and would just as easily and quickly self-immolate in an enormous ball of flame if even only slightly encouraged to do so. They quickly got the nickname Kaiser Coffins, as my father called them. All 50 were nearly identical (again cheap, quick and, I presume, profitable was Mr. Kaisers purpose), so there are a lot of ships very similar to this one that can be built.
I originally intended to write a report on this build and did actually take numerous photographs until about 50% done. But alas, the size of the report just got out of control. I started with the Yankee Model Works USS Gambier Bay kit expecting only some minor changes during the build. But, as it turned out, the kit differed so substantially from the plans (supposedly for the same ship on the same date) that only 12 of the 100s of resin or white metal parts from the kit were actually used:
A greater percentage of the kits PE parts were used. But, many did not fit correctly after the design was altered to match the plans and in many cases there was a shortage of kit PE parts.
All the other thousands of parts in this build were either scratch built or provided by some third party detail parts manufacturer. For example, 100% of the gallery deck platforms and catwalks were 100% scratch built in order to correctly use perforated decking where applicable. Therefore, Im going to consider the Yankee Model Works contribution to be no more significant than the contribution of LArsenal, for example, which actually contributed far more individual parts to this build.
If your goal is to create a simplified and quite abbreviated model of a Casablanca class escort carrier, the Yankee kit will do the job. But, if you want it to be accurate, plan on adding a lot of extra scratch and third party items.
PRIMARY INFORMATION SOURCE
I decided early on that I would use the Floating Drydocks October 1944 Gambier Bay 1/96th
scale plans (as drawn by Thomas Walkowiak) as the primary information source unless photos
could absolutely prove otherwise. Considering that there is only ONE (count em ISO in Tagalog)
photo of Fanshaw Bay known to mankind and that it is distant and fuzzy, that pretty well
leaves those plans as the only information source. Luckily there are also a very few close-up
photos of detail areas of sister ships at a very few specific locations.
There is, at least in my mind, some confusion about what camouflage Fanshaw Bay carried in 1944. The ONE photo that exists everywhere shows her in MS22, which she did wear prior to 1944. There is one additional unique photo only on the Fanshaw Bay reunion website that shows her in MS33-10A. But the Snyder and Short ship Camouflage website database, which has proven correct on numerous previous inquiries, claims that in 1944 she was painted in MS32-4A. There is nothing that I can see in the MS33-10A photo (no hull or deck number) that proves the photo is actually of Fanshaw Bay. I therefore decided to go with the usually correct Snyder and Short suggestion and paint her in the rather unusual and challenging MS32-4A.
RESOURCES
MATERIALS USED
THINGS I WISH I COULD HAVE DONE DIFFERNTLY
I bought and built the super accurate Veteran Models open 5 gun. Its just perfect and I
highly recommend it. But, I wanted to show the gun in action with sailors in the control seats
and there was just no possible way that the 1/350-1/400 LArsenal sailors would fit in those
guns. Perhaps they are a bit large. So I built and used the adequate (but not as accurate)
Yankee gun that came with the kit, which had room for the seated sailors.
I built the Yankee PE 20mm guns. While the barrels are much more representative of the real thing than any plastic 20mm gun I have ever built, the Yankee guns are missing good detail sights, have only a single shoulder support (not much use) and have no elevation wheels. All those excellent details are included in any GMM PE set. But, my spares are out of all those items. And, they are nearly invisible anyway.
THE AIRWING
There does seem to be some confusion regarding which squadron Fanshaw Bay carried in
this battle. Some sources claim it was VC-60. But that is incorrect. In fact, VC-60 had been
relieved by VC-68 just a few days before the battle. A VC was a composite squadron consisting
of 12 to 14 FM-2 Wildcat fighters and about the same number of TBM Avengers. At any time,
several would be down (broken and awaiting parts and repair). I have found no information
that details the number of operational aircraft aboard Fanshaw Bay on this morning. At about
0500 Fanshaw Bay launched 12 Wildcats in support of the pursuit of the defeated
Japanese fleet at Surigao Strait. A few minutes into this battle Sprague ordered the launch
of all remaining aircraft in the task force with or without bombs, bullets or fuel.
Generally, the Avengers were launched first from the catapult (for a more rapid launch).
The remaining Wildcats could launch without need of the catapult by making a run down the deck.
The arrangement of aircraft I have included is only speculation that by 0745 very few remained
to be launched and that those were basically unarmed and low on fuel. When under attack, the
most important action for a carrier is to get all aircraft in the air as rapidly as possible.
The ship is expendable, but the primary weapons (the aircraft and experienced pilots) are not.
Based on photos and drawings, I believe that the aircraft are properly painted as was the case
for VC-68 on this day. The tail numbers I used are total fiction.
A BRIEF WORD ABOUT LARSENALS NAVAL FIGURES
This is the first time I have used these little 3d resin naval figures. They are a vast
visual improvement to the GMM flat folk figures. However, should you choose to use them, be
prepared. First, they are considerably more expensive. Second, if my experience is any example,
expect that about 25% of them will arrive broken or will break during use. Heads (in particular),
arms and legs tend to break off with very little effort. And third, you will spend a LOT of time
very carefully trimming off flashing (hopefully without also removing the heads) and touch-up
painting each one AFTER removal from its sprue. Thus, painting them is MUCH more time consuming
than are the flat folks.
CONCLUSION
All-in-all this was a moderately difficult build. The task of getting it right was a
continual challenge. All too often, efforts to alter the Yankee kit parts to match the plans
eventually proved fruitless or overly confusing because of multiple adjacent incorrect parts
and led to the ultimate decision to just discard them all and build it all from scratch to
match the plans. The entire project would have gone much faster and easier if I had just begun
with that intent in mind.
Total build time was an unnecessarily large 310 hours with perhaps a third of that time wasted while unsuccessfully attempting to make greater use of the Yankee kit parts. Unfortunately, unless you wish to scratch build the hull and flight deck, the Yankee kit is the only solution in 1/350 scale. And, honestly, I am being a bit unfair to Yankee since the price of their kit (despite being rather high) and the quality of the flight deck in particular, more than compensate for the time required to scratch build those items. The kits great weakness is in the inaccuracy and lack of detail of the sponsons, forecastle, fantail, and in particular, the gallery deck and catwalks. However, the flight deck is excellent and quite highly detailed.
