1/350 USS Enterprise CVN-65 (Tamiya)
|
by Mark Krumrey |
1/350 USS Enterprise CVN-65 (Tamiya)
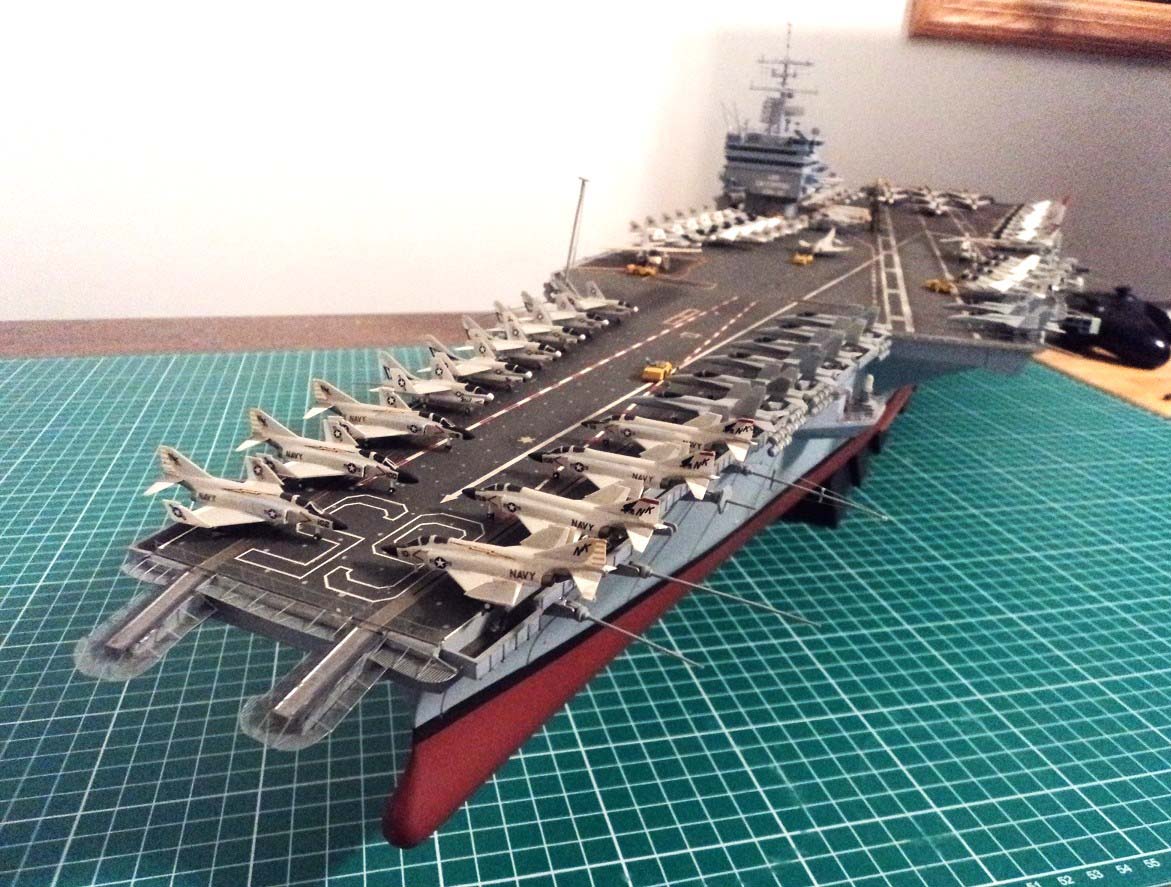
I received the Tamiya 1/350 USS Enterprise, CVN-65 as a Christmas present inabout 1998 or so. I started it by doing the airwing first. There are over 65airplanes on the model. I fashioned a basic hangar deck to fill the void and placesome airplanes on it and open up the hangar bay doors. They are all Tamiyaaccessory aircraft for the kit. It then sat in my basement for years collectingdust. I would dust it occasionally to keep it looking good, but over time stuffstarted falling apart, and when I moved from Wisconsin to Arizona, I gave it tothe lad in Wisconsin. He was always going to make repairs but never did so, itgave me something to do on my last visit with him. I removed the island and the rigging on it,found all the photo etch platforms for it and started on that re-rigging theantenna wires and halyards. The light in his model room is less than stellar,coupled with I had no optivisor to assist with some of the details, it became achallenge to do some of the small details, but in the end, I was happy with theway it turned out. I then turned my attention to the flight deck. I removed allthe aircraft and most of the photo etch as I had planned on salvaging that, butwhilst scrubbing the model in the kitchen sink, a couple of the pieces wentdown the drain, so I ordered the Eduard "BIG ED" PE set from SprueBrothers special delivery which arrived the next day. I went over the flight deck twice with atoothbrush, soap and water over the sink, and then in the cat walks I sopped upas much dust as possible with a dampened Q-tip. I added some decals to theElevators from a decal set from Starfighter Models for the Enterprise toinclude the UNREP station markings on the Elevators, I thought that was a nicetouch. Once I was satisfied with the condition of the flight deck and theIsland, I began replacing the aircraft. Using the images, I took of the modelprior to cleaning I replaced them pretty much the same way. During the initialbuild, the lad was ten and thought it would be neat to put a guy on the deckwith an RC transmitter that he had fashioned from some scrap plastic and wire, forthe fun of it, so I put that figure on as well. At that time my son painted up an F-4 from adifferent squadron with graffiti as if it had landed by accident on theEnterprise. He did the weathering on the flight deck all those years ago andmanaged to survive the scrubbing the cleaning. With a few extra PE pieces onthe stern and the much-improved netting around the flight deck I think itturned out pretty good. The decals on the bridge are a combination of original kitdecals.. I cut up lengths of Evergreenstrip to simulate the fluorescent lighting as this is how the ship appeared inthe Detail and Scale for the Enterprise book, which I used for a referencethroughout the initial build. I used a combination of kit decals, letra set andnumbers for the "Big E" on the back of the island. The aircraftmarkings are from Gold Medal Models and airplanes are as I built them on theinitial build. I thought they turned out pretty good for as old as they are andbeing hand painted, I am surprised that they still look as good as they do.I ordered a set of Eduard pre painted figures and put them in clusters around thevehicles and tried to pose them in realistic positions. I would have done morebut I ran out of time; there are more figures to pose and on my next visit, I willfinish placing the figures around the model.
So there you have it. In person it looks pretty snappy all cleaned up, with afresh PE set around the flight deck and other areas.
