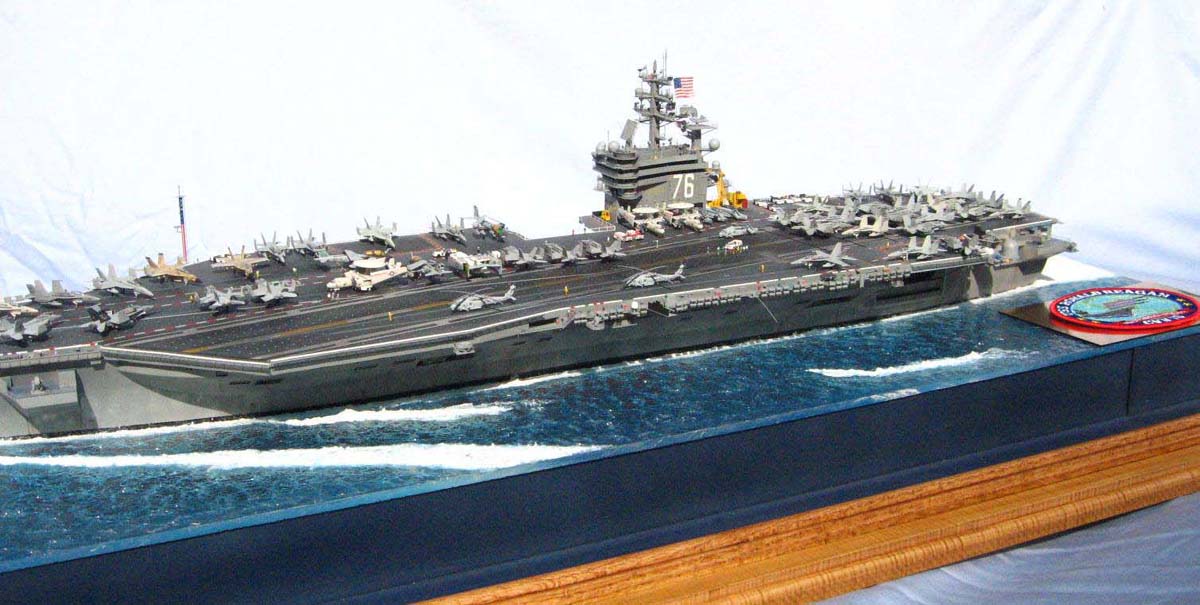
1/350 USS Ronald Reagan, CVN-76 (Trumpeter)
|
by Ryan Labieniec |
1/350 USS Ronald Reagan, CVN-76 (Trumpeter)
Well it seems that all of my write-ups on my carrier builds start out with this is my most detailed project to date or something like that. Well, that is still the case with the USS Reagan, I guess it means I keep pushing my own modeling boundaries, which is a good thing. Having built a few Nimitz class carriers for commissions, I got tired of always seeing my best work leave my shop never to be seen again. All of my best work has been commission work, and frankly I was getting jealous that none of the models I have in my own collection are up to the quality that I build for my customers. My solution to my jealousy problem was to pull out all the stops and make a super-detailed carrier for my own fleet, no matter how long it took, and no matter what the cost. The result is what you see here, a model of the USS Ronald Reagan, where not a single corner was cut, and not a single expense was spared (and man did this one put a decent dent in my wallet). The build time was about 2 ½ years from November of 2011 till June of 2014, if I had to estimate, I would say that I spent between 2,000 & 2,500 hours working on her and the air wing.
Saying that this is a Trumpeter kit gives much undue credit to Trumpeter, as this is pretty much a scratch build. 17 parts were used from the kit without major modification or outright scratch built replacement, most of those parts are the prop shafts and struts.
Accuracy and detail were my driving forces throughout this entire build.
The build process from the keel up:
Hull
The lower hull had to have the bulbous bow that is unique to Reagan and Bush added. I thought it would be a simple process, but it turned out to be a hell of a test of my scratch building abilities. I cut out a section of the kits lower hull and inserted a block of Styrofoam insulation board. I then went to work drawing the bow profile on the top, sides, and bottom, and then sanded the bow to shape. Getting the right shape took me many more attempts and restarts than I care to remember now, but needless to say, several weeks were spent working on the front 3 of the ship. Once I had a shape I was happy with, I coated the bow in a thinned layer of spackling, and sanded it smooth. Blending the complex curves of the bow section into the hull curvature was a daunting task. In the end, all the time I spent on the bow was probably not worth the effort, and I should have just waterlined the damn thing, but like I said, I wanted to cut no corners on this one.
The upper hull required major modifications all over the place. The bow and stern weapons sponsons all had to be built from scratch with styrene. The overhang section below the island was extensively modified from the kit part in order to add the RHIB bay and the hangar dump bay, as well as filling and removing some other UNREP bays. The fantail section was heavily modified with styrene, solder wire, and electronics components. The overhang area of the fantail was removed from the kit parts, and a much larger and correctly angled overhang was added from styrene and filled with liquid resin. All of the SATCOMM sponsons were built from scratch and detailed with spare PE. The ships crane on the aft starboard side was scratchbuilt and rigged with caenis line. Several openings on the port side were filled, while others had to be built from scratch into their correct locations.
Hangar
The hangar bay details are all scratch built and are accurate to the Reagan. The fire door mural is a home made decal made from a photo of the actual mural, my best home decal printing job so far. Hangar details are made from various styrene profiles, doo-dads and PE from the spares box, electronics components, and solder wire. The hangar is illuminated with LED light strips, and is wired so that it may run off of battery or wall outlet power. Aircraft in the hangar are undergoing an array of various maintenance activities, and all are detailed with scratchbuilt accessories. There are 15 aircraft total in the 3 hangar bays.
Catwalks
The catwalks were something I set out to improve on in this build, and these are by far the best, most accurate and most detailed catwalks I have yet to produce. I amassed a collection of several hundred catwalk photos taken from every angle you could imagine and I did my best to add every detail that I could fabricate from scratch, and ensure as much accuracy as my photos would allow. There are a few small sections of the catwalks on my model where I simply could not find a reference photo, so in those few areas I had to make an educated guess. All of the stairwells under the catwalks are resin casts from scratchbuilt masters I made from styrene and butterboard. The mirror landing array system (MLARS) on the port side was built from scratch. That tiny little piece of gear was a single part on the kit, but turned into a 39 part project by the time I was done.
Life Rafts
The life rafts were cut apart into individual canisters from the kit parts, sanded accordingly, and then added onto Toms Models PE canister racks. This process was tedious and boring, and difficult to align properly (probably why most modelers, including myself on previous models skip this process and go with the kit parts), but the results were well worth the effort (I think/hope).
Flight Deck
The flight deck on this particular kit was a very poor fit and had a warp in one area as well. Some very tight clamping, heavy sanding, and strategic placement of a few aircraft was required to get a good finished look. I actually sprayed patches of several different shades of grey on the deck to represent the touch-ups that are rolled on the decks, but the weathering and flat coats more or less blended the greys all together. There are a few faint traces of the different patches left, where just the very edge of the different color is visible, looking more like a very faint seam line than a paint difference. All of the deck markings, including the #s on the bow were masked and air brushed, eliminating any possibility of decals silvering.
Island
The island on this build is probably one of the modeling achievements of which I am most proud. The island is a total scratchbuild, with the exception of the kit window parts were cut apart and repositioned for the windows on this island. The island of Reagan is a different size and footprint than that of Nimitz, and incorporates the aft radar tower into its structure. I made all of the structure of the island from styrene and gave it surface details from spare PE, wire, and other bits from the spares boxes. The masts are carved and sanded to shape from butterboard, again detailed with spares, styrene supports, and various gauges of wire. The main mast is comprised of 179 scratchbuilt and heavily modified parts. The island and especially the mast are the most intricate structures I have ever made from scratch, and somehow I was lucky enough that I was able to make them on the first try, still not sure how I pulled that off
Airwing
The airwing I have modeled on Reagan is CVW-11, who did the initial carrier quals aboard Reagan in 2003. In my research for this build, I happened to stumble across a picture of a camouflaged Hornet of VFC-12, the Navys aggressor squadron, landing aboard a carrier. I clicked on the photo, and to my pleasant surprise, it was taken aboard Reagan during the exact time I was modeling her, so I knew that it was a must have on my flight deck. I mean how often do you get to see a camouflaged plane aboard a modern US carrier? This was the first time I had ever seen it, and given the # of carriers I have built and researched, that is saying something.
All of the aircraft have scratchbuilt cockpit details, including pilots in a few of them. They also all have scratchbuilt landing gear doors and additions to the landing gear.
***If you look VERY closely, you will see that on many of the aircraft I added scratchbuilt red remove before flight tags to the landing gear pilot tubes and sponsons. To my knowledge, no one has pulled that off on a 1/350 CVN before, so I am going to give myself a little pat on the back for that one!
There are a total of 70 aircraft on board, 55 topside, and 15 more in the hangar. This is by far the largest airwing I have ever done, and I do not care to do another of this size any time soon.
Crew
The deck gang is a mix of a ton of larsenal and Northstar figures, and a few Dragon figures. All were hand painted, even given the tinted goggles that are always strapped to the top of the deck helmets. I lost count of the figures, but topside there is between 200 and 300 crew figures scattered about, some working, some slacking, and lots pretending to work! That scenario is about as realistic as you can get during non-combat operations!
Vehicles
The deck tractors are all from Black Dog, and are by far the best I have ever seen. All of the specialty gear like forklifts and the Zamboni are from JAG. The large Tilly crane is scratchbuilt from styrene, wire, and re-purposed parts from the JAG crane.
Seascape
This type of seascape was a first for me. I wanted Reagan in water, but I wanted to be able to see the lower hull, where I did so much work making that damn bow. The solution was a technique described in the March 2004 issue of Fine Scale Modeler in an article by Bob Santos. Thanks to Tracy White for pointing me in the direction of that article. It is an above/below surface technique that uses a clear plexi sheet for the surface of the water. I varied Bobs technique, and stipled a wave pattern on both sides of the sheet with clear gloss gel medium. The water gets its blue tint from the wooden base being painted a very dark blue. I like the effect for what it is, giving the ability to see above and below, but it is a lot more work, and a lot of money on the plexi glass due to its massive area and the thickness needed.
Materials Used:
This was one heck of a journey from start to finish. My skills have evolved so much from the start of the build that now I look back at some of the things I did early on, and wish I could go back and change them. I am very happy to say that I FINALLY have a carrier in my own fleet that I am proud of, and is a good representation of what I can do. Now that should take a little bit of the sting out of the departure of my next commission build. Thanks very much to everyone who followed along on the build log, offering suggestions and constant encouragement. The support of the forum really helps me weather the storm on a long build like this, and my fellow modelers push me to keep raising the bar for myself. I can finally sit back with a cold beer and look at a model I have in my collection and be happy knowing that I have a carrier that is on par with the ones I send off all over the place to their new owners. That being said, this one is for sale, the price is one bazillion dollar$!
Full in-progress build log can be seen here.
Semper Fidelis
