by David Salvin
1/700 USS Monssen DD-436 (Dragon)
The Ship
I didnt realize before I began my research for the build that the USS Monssen had a storied history including escorting the USS Hornet on the famous Doolittle Raid to Tokyo and ultimately being sunk during the night action off Savo Island near Guadalcanal in 1942.
The Kit
The new 1/700 "smart kit" from dragon models. The kit allows for the construction of two complete destroyers; one waterline the other full hull. I chose to do the Monssen as a full hull.
I had previously reviewed this kit in a box review for ModelShipwrights.com. As I predicted, the kit was a wonderful and pleasurable build with a few very small exceptions.
The Build
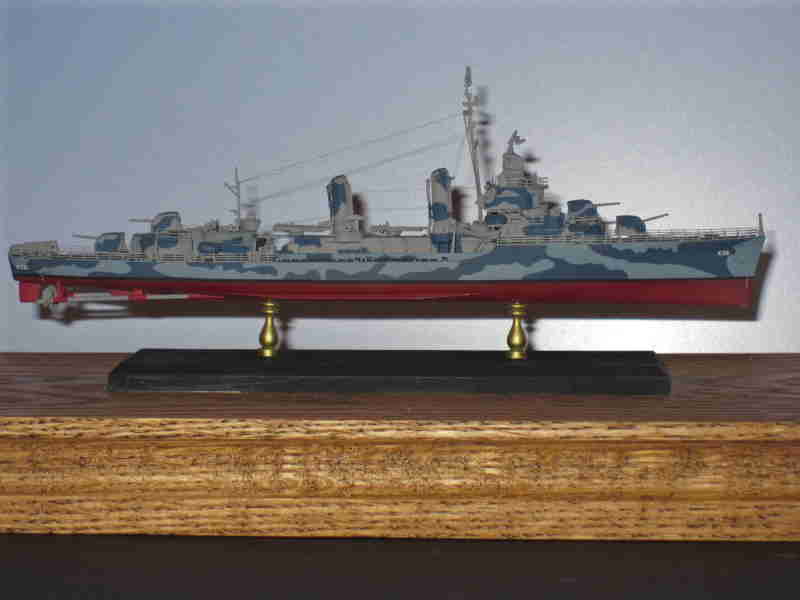
I had originally intended to use this full hull kit to depict the Monssen in her natural state - plowing through the heavy waves of the Pacific with water crashing over her bow. However, once I had finished the multi-tone Modified MS-12 on her, the hull lines and painting, she simply looked too beautiful to "hide" under all the water effects. So I elected to finish her as new, un-aged, and mount her on the pedestals which Dragon very thoughtfully provided.
I began by painting the hull along the waterline black. Then I cut a very thin length of painters tape to cover and thus form the black waterline. Leaving that tape in place, I masked above the line and painted the red anti-fouling paint on the hull. Then I removed the mask above and masked the red part of the hull. I then painted the upper hull the dark blue used for the MS-12 camo. While the normal course is to paint lighter to darker covering the lighter paint with the darker, after analyzing the camo pattern, I realized that it would be easier to cover the dark splotches with a single piece of masking than to mask the lighter paint on either side of the intended dark splotch. Again, I have to plug Kenny Loup and his Gatorsmasks which can be found at As soon as I realized the sheer lack of size of the ship and the complexity of the camo, I immediately called Kenny. He custom created the MS-12 mask I needed for both the Livermore and the Monssen and sent them out.
Frankly, at 1/700 scale, I dont think it would be possible to recreate the modified MS-12 camo pattern with this level of detail and authenticity without the pre-cut gator masks. They worked perfectly. As long as you airbrush lightly over them with light coats and do not let the paint run, they mask cleanly every time.
After doing the camo on the hull, I built the major superstructure components and used the masks to do the camo down the sides. Then, painting the deck blue was simple since all the major structural pieces were in the major chunks and easily separated. I just taped the sides for good measure and sprayed the deck color navy blue 20B. ( a slightly darker blue than that used for the sides). It should be noted that the base gray for the hull was 5-0 ocean grey, while the base grey for the upper structures above the hull was haze grey.
One of the few issues that I had with the kits instructions were the funnels and a few missed pieces on the PE fret. The instructions are confusing when it comes to the funnels. The front funnels are labeled L1 and M1. And there are two sets of instructions for their construction. One would assume that L1 means Livermore and M1 means Monssen, but that is not the case. Both the Livermore and the Monssen will get one L1 and one M1 stack. I dont know why they are labeled that way in the instructions. The parts went together fine, however, in my kit, the rear funnel was too close to the rear torpedo launcher to fit into the holes pre-drilled for the stack. I had to cut off the pins underneath and scoot the funnel a millimeter forward to clear the rear tubes. Otherwise, the kit was set up perfectly, and they included small divots in the deck to indicate where fittings and things go even as small as the ladders. This made construction a pleasure after fighting with and cursing the resin kits with poor to non-existent directions.
Once the deck was painted, I followed the easy instructions to place the decals for the anti-slip mats placed along the deck. While difficult to see against the 20B deck blue, they are visible, and add a great deal of authenticity and detail to the kit. The most difficult part of the decals was cutting them off the paper without damaging the second set of decals for the second build while keeping the numbers in tact if I ever want to go back and build the waterline version.
Once all the major components were painted, final assembly was easy. Due to the small size of the kit, I installed the weather deck railings before I put on the superstructure parts to give myself more room to work. Unfortunately, the railings in a kit this size are going to be over-scale. Its unavoidable. Extent pictures of the day show the railings on DDs and small ships were no more than small stanchions with thin wire for the cross bars. Therefore if we were to scale that down to 1/700, it would be unmanageable gossamer. So, I picked the thinnest aftermarket rails I could find and used them.
Final rigging was done literally with gossamer - I stretched spruce to the limit in order to get it as thin as possible. Even 20 Denier fly-fishing twine was too thick for the rigging on such a small ship.
Another of the small regrets I had on the kit was the radar on top of the mast. The kit had a plastic piece for it, and I replaced it with aftermarket PE I had left over from another kit. Since Dragon included PE with this kit, they should have given us that critical piece in PE to make the ship look more realistic. Another small detail are two pieces of PE which were supposed to be bent into a semi-circle to be used as shields for the upper bridge next to the MK 37 gun director. While bending PE should not have been too tough, it was for this kit as the PE is much thicker than that used by Flyhawk or Lion Roar and for such a small piece, it proved nearly impossible to bend into a smooth semicircle. The best I could manage was a V-shaped bend. Dragon should have used thinner PE, or had pre-cut groves to assist in bending those pieces into semi-circles. A small detail no doubt.
While the kits instructions actually tell you that there are plastic pieces which you will not use in the build so youre not left wondering what you may have missed, there were several PE pieces not mentioned anywhere in the instructions, and I still am not sure where they go. (A few crane hooks I think)
Overall, this is a model builders model. Highly detailed and accurate. Detailed enough for the most experienced modeler, however, with two full kits and parts, perfect for a newer modeler to try his hand at the 1/700 scale and photo etched parts. If mistakes are made or parts lost, heck, you have another entire set of parts as spares. Or, if you dont like the result, do the kit again with the experience of the first build. Either way, this is a fantastic kit and a great build.
