by Ed McDonald
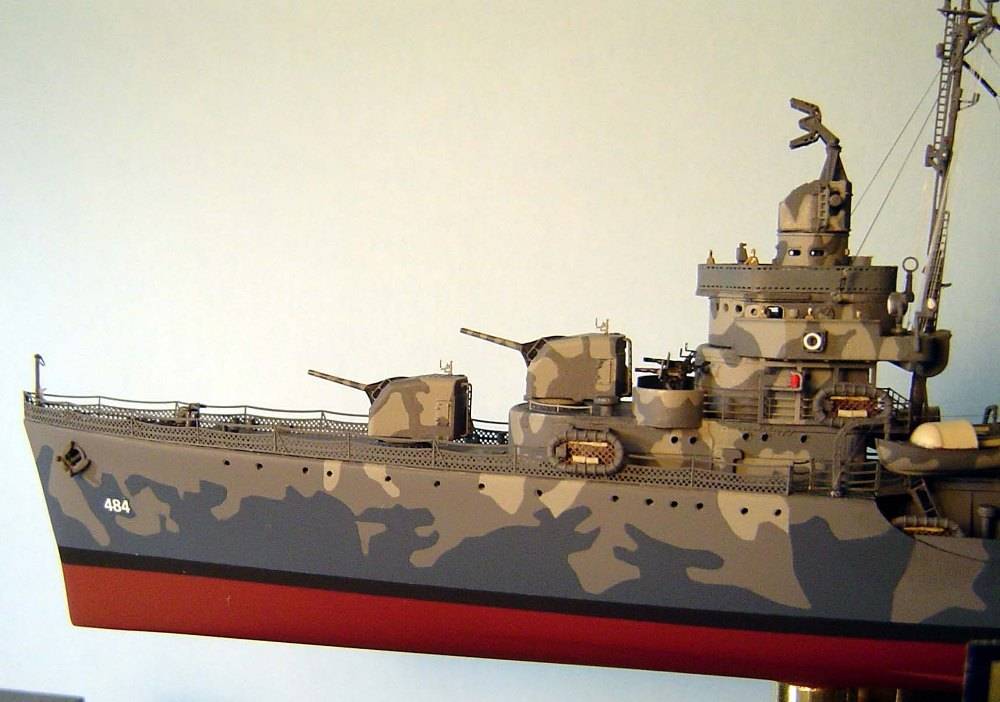
1/350 USS Buchanan DD-484, 1942 (Dragon)
This is Dragons 1/350 USS Buchanan DD-484 as she appeared in 1942. It is also one half of a simultaneous side by side build, the other half of which was Tamiyas 1/350 Fletcher DD-445.
There is no question that Buchanan is the most highly detailed and accurate plastic model that I have seen. All those details that are frequently absent from a plastic model (polaris, 5 practice loader, signal lights, running lights, sky lookouts, on and on) are included. Additionally, the detail level of many parts that are normally rendered in rather poor detail (guns, bulkheads, torpedo tubes, etc.) is superior.
This was not an entirely out of the box build. Instead, Buchanan and Fletcher have been enhanced to the same high detail level that I would normally include on any model. Due to the already high detail of the Dragon parts, I expected that it would take considerably less time than the Tamiya. To my surprise, that was not the case. I spent 142 hours on Buchanan and 152 on Fletcher.
To be fair, it was my first build of a Dragon kit and I had just previously completed a revised version of Fletcher as USS Nicholas. So certainly, my familiarity with the Fletcher kit and lack of familiarity with Buchanan had something to do with it.
But there were other factors. Buchanans instructions were a bit on the poor side. On several occasions part numbers in the instructions were incorrect, leaving one searching and searching for the correct part. Occasionally, optional parts use was vague and left one guessing. On at least one occasion the instructions quite specifically instructed me to use an incorrect match of stack top and bottom pieces such that the forward stack would have ended up with the aft stacks bottom and vice versa, had I not caught the error. On a few occasions the instructions failed to offer sufficiently detailed views and left one very much in doubt about what the finished assembly was supposed to look like, or caused me to incorrectly assemble parts which needed repair later on. Additionally, in most cases the extra Dragon PE railing set just did not fit correctly and I had to resort to some generic GMM railings instead.
But for the most part, the unexpected time was spent dealing with the terribly small Dragon parts. Unfortunately, the decisions regarding sprue connection points are frequently poor, leaving a highly visible spot that needed filing and clean up work. Considering how tiny many of the parts are, it was often quite a challenge to both hold and repair parts.
Lastly, in many cases I could scratch build small parts (5 practice loader, polaris, torpedo director, signal lights, etc) just as fast or even faster than it took to clean and assemble the Dragon parts.
But I think the biggest difference is that the Dragon kit is just well, different. Thats about the only way I know to put it. Its subtly unlike any kit Ive ever built and there is no question at all that it is the most highly detailed kit I have ever seen. But, that difference took some time to adjust to.
I added the following enhancements:
My thanks go out to Ron Smith for finding the solution to the issue of antenna insulators. Ron, Ive been searching for this for years. Your idea of using 32 gauge wire insulation is perfect and produced an excellent result. Thanks again.
