by George Warren
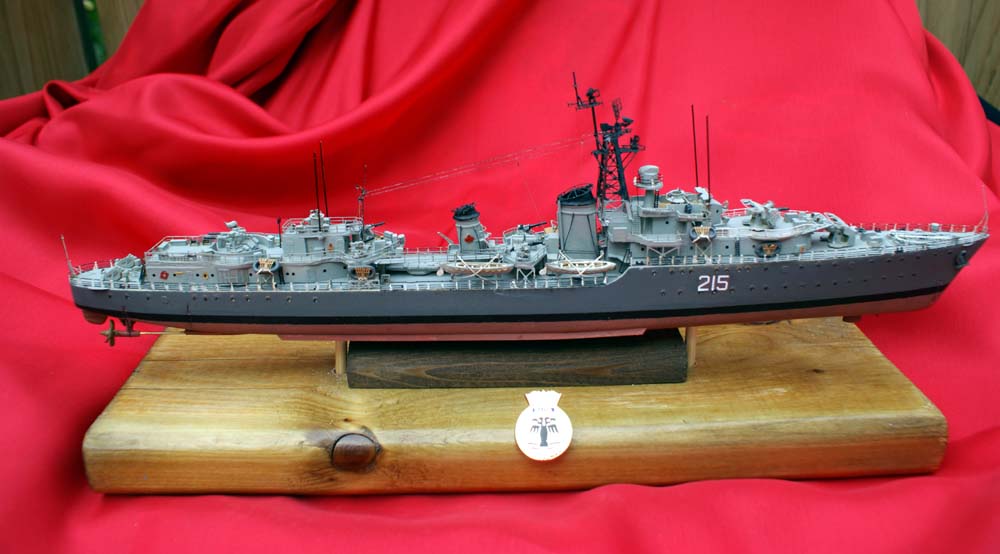
1/350 HMCS Haida (Resin Shipyard)
This is easily the most impressive model I have done so far out of my small fleet of eight completed ship models. I did this one very much "out of the box" and without any laziness on my part as it is very, very difficult to enhance and there is sufficient detail to be a positive challenge. HMCS Haida was in the first batch of four RCN Tribals that were built in the early 1940s. However this model takes the RCN Tribals to the next step by depicting Haida after its rebuilding into an anti submarine escort during the post WWII period which makes this model very unique indeed. Haida’s impressive WWII accomplishments are well recorded and they continued with two tours in Korea and makes this ship very worthy of this model. Thankfully HMCS Haida is now preserved in Hamilton, Ontario which makes a matched pair with the Flower Class corvette HMCS Sackville preserved in Halifax, NS.
The instructions total 14 pages and include colour to assist in parts folding and assembly and end with two colour profiles covering the 1953 and 1956 versions. You can see the bits and pieces of this model at the Resin Shipyard web site accessible from Model Warships. In summary there are 4 PE frets of varying sizes and 3 parts boxes. I did the 1953 version as the grey two tone scheme is much more appealing to me than the still current shade of grey-green which was used in the 1956 version. Resin Shipyard also supports the model with a CD with photos mainly of the preserved Haida which is well worth its low cost. The Resin Shipyard web site also has pictures of the completed model without painting to assist with the placement of resin parts. These details are all very useful in mastering a model of this detail. What makes this model very impressive is not only the ship specific parts but also the common items such as the railing, reels (3 different sizes (4 parts each), life rings, oars (for the boats and rafts) and rudders for the boats, immensely detailed radars, doors with different details, port hole eyebrows, and fire hoses and all are separate pieces and none molded on.
The elapsed time for actively building Haida model was just over six months spread over the past year. I should have placed the signal flag walkway somewhat lower and when I realized my mistake it was too late to remove it without mangling it. I tried to balance that error with a few enhancements including two round vents adjacent to the anchor chains on the bow, jack staff at the stern, and I double stacked some extra rafts as seemed to be evident during its last Korean war tour. I used an airbrush on the dark grey of the upper hull. I rigged with Lyra and as an educational exercise I also used stretched sprue (thanks to Jim Baumann’s thread) and paint brush bristles. I plan to replace the resin 4 inch gun barrels with brass as one resin set arrived broke and lost and I broke another one during assembly therefore I left the turrets barrels in less than adequate state, ie no blast bags, etc. I should also replace the 40 MM barrels with brass rod too. I skipped a few details, such as the tiny triangles to be placed under the smaller platforms as supports and the hand rails and I should revisit the later. Lessons learned for next time include using the airbrush on the superstructure as well as the upper hull, practice more with stretched sprue and paint brush bristles, and to use the magnifying light more often. Hopefully this will help me do a better job with my recently arrived Resin Shipyard early 1970s built "280" class tribal destroyer.
Over the summer I acquired my first digital camera and this is my first use of it for model photography. Haida’s badge is a lapel pin also from Resin Shipyard. The picture of the three destroyers include front to back Haida, Resin Shipyard HMCS Kootenay D-Class (done in 2007), and my conversion of the ISW Zulu/Nubian into Haida (2006) also my first resin model which does need a refit!.
Useful HMCS Haida reference material
