by Andrew Ayling
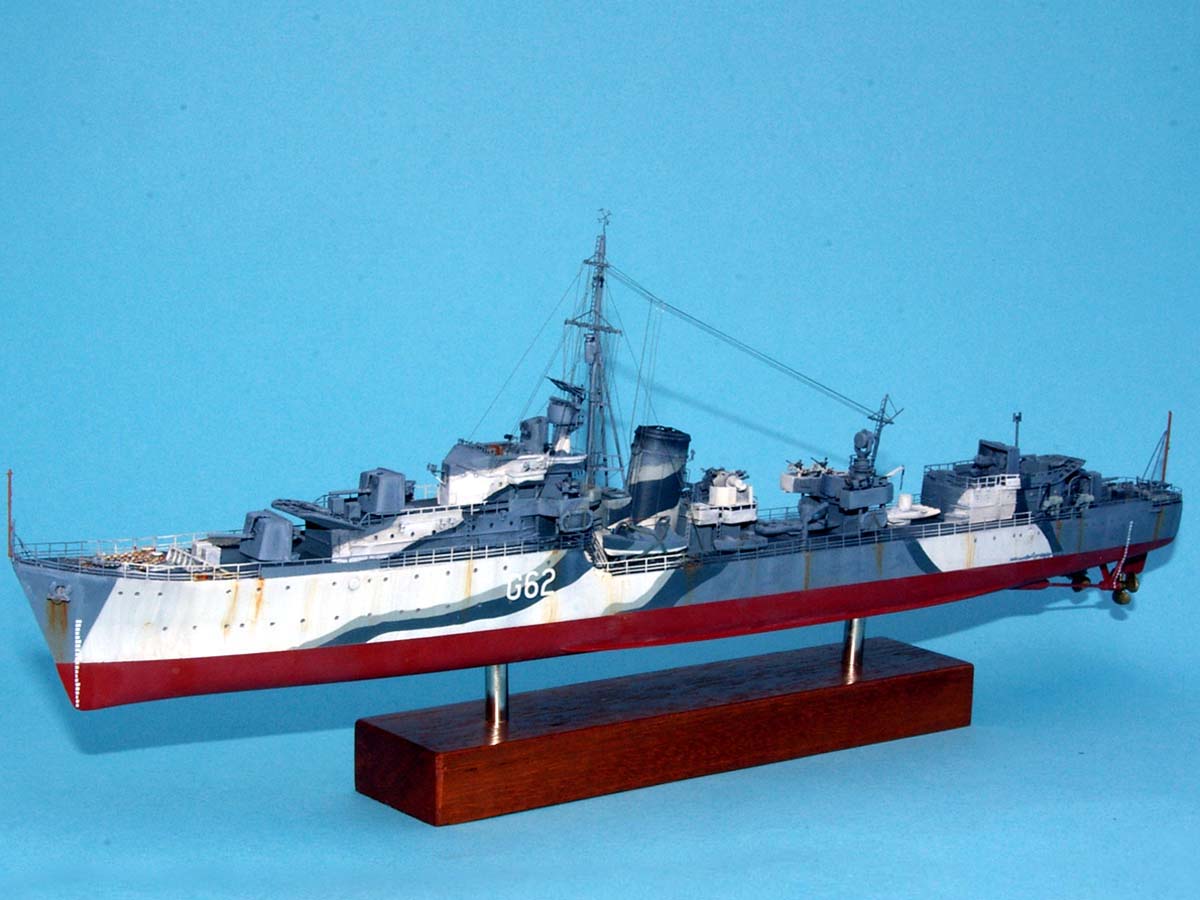
1/350 HMS Quality (White Ensign)
A few months ago I picked up a 1/350th HMS Kelly on eBay mostly as it was going cheap, Id previously converted one into HMS Jervis (link) and so this one went to the back of the stash for a while. On re-reading the Whitleys Destroyers of WW2 book I worked out that the design of the Q and R flotillas were pretty close to the J,K&Ns. The main differences being armament and stern shape. The later Emergency Flotillas gradually changed further from the original design so will wait for another day.
All the pieces came together when I bought the Resin Shipyard Haida and Kootenay kits. I used the guns from Kootenay to build the Quality, and Kellys mounts to back date Haida to Eskimo for a change I built both the ships at the same time.
Id previously bought a card model of HMS Saumarez which was useful for some of the major shapes and positions.
Before I joined the upper and lower hull together, I drew around the stern sections to get the original shape this was transferred to plasticard and the Saumarez plan and Mk1 eyeball used to get the new shape at deck and waterline. A bit of milliput and sanding finished the job. The remainder of the hull mods were straight forward:
New deckhouse from plasticard based upon the dimensions from Saumarez,
20mm tubs were eyeballed from an overhead shot of one of the class in Ensign 6 and built from platicard
Searchlight moved to a raised platform built from scrap.
Radar office added on top of the galley in the centre of the mast tripod - from scrap resin
The bridge required a few changes
Bulkheads below the signalling platforms cut away and replaced with plastic strip pillars, similar added under the 20mm platforms. Lookouts (abeam range finder) cut away and re-built from platicard.
Theres a great tool for this kind of job- if you take a single sided razor blade, place it blade upwards on your bench and then tap it along the length of the blade with a scapel, the razor will get tiny chips and dents and can be used as a very fine razor saw Ive used mine in the past to saw individual elements from fitted brass railings with no problems and of course it can be re sharpened by tapping with the scalpel again.
Various hatches and details were added from spare etched brass sets, wire and blocks of evergreen based on observation of photos etc.
The 4 main gun mounts are extras I ordered from resin shipyard, however I chose to replace the barrels with brass US 5 barrels cut down to the correct length. I also clad the fronts and tops of the gunshields with thin plasticard to reduce the size of the apertures which I felt are a bit too big on the original. Details again came from etched brass sets and plastic strip. The locations for X and Y guns were worked out from the Saumarez plans again.
At the same time Id ordered some quad torpedo mounts, but in the end I got impatient and built them from rod and strip. The 20mm mounts are from LAresenal. Everything else is from the original kit.
Ive always built my ships as sub assemblies complete with all the etched brass fitted prior to painting it adds to the masking, but Im pretty messy with Superglue and this build was no exception. All paints were WEM and airbrushed on, masking was with Tamiya tape and blutack for the dazzle patterns. Washes and weathering was a combination of oils and humbrol enamels. Final assembly and rigging with invisible mending thread were carried out bit by bit in the most logical order, followed by a good blast of matte varnish.
