by David Salvin
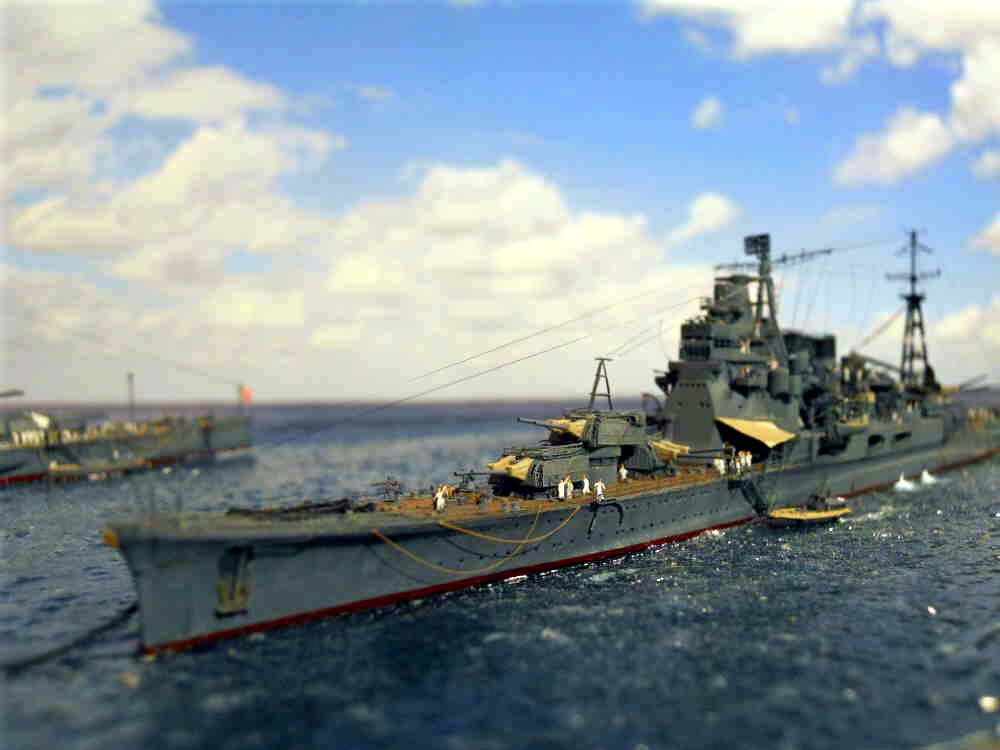
1/700 IJN Nagato and Takao (Aoshima)
Name of the diorama is "TROUBLED ANCHORAGE"
This diorama depicts the IJNS Takao with the IJNS Nagato in Brunei Harbor in October of 1944. Crews on both ships ready them for the coming battle with the overwhelming firepower of the American naval and air forces.
The History:
In October of 1944, just prior to the battle of Leyte Gulf, the Japanese marshaled what little naval resources they have left to oppose the allied landings in the Philippines.
At Brunei, before departure, Nagato's Mitsubishi F1M2 "Petes" are transferred to Yamato. Her conning tower, compass bridge, casemate guns, directors and ammunition hoists are protected with hammock "mantles". Her AA guns are protected with steel cables and her searchlight positions with manila ropes as makeshift splinter protection. Her rudder engine fuel tanks are covered with judo mats.
Nagato, Yamato and Musashi along with the cruisers Takao, Atago, Chokai and Maya (along with supporting destroyers etc) sortie from Brunei towards the Philippines with Vice Admiral Kurita Takeo's First Mobile Striking Force, First Section, Force "A" (Center Force).
The Build:
I used the newly released Aoshima Takao along with Aoshimas newly released Nagato 1944. Both kits are extremely detailed in their own right, however with the addition of the aftermarket hyper detail PE sets from Lion Roar, the ships come alive with detail and in the end wind up dripping in PE. In fact, for the first time Ive seen, Lion Roar attempts to replace most of the main pagoda on Nagato with PE. This attempt partially fails however due to the fact they used the thinner brass for several of the levels and have provided no transitions between the levels. For several levels it appears they expect you to cut off the vertical structures of the levels from the plastic kit to connect one PE level to the next. (The instructions, as usual, leave it up to the builder to figure these things out.) I wound up using most of the PE levels, but for at least one, it made more sense to use the plastic for structural integrity and continuity. As I indicated in my January review of the Nagato PE set on Modelwarship.com, the instructions are nice for their showing what each level of the pagoda is and exactly what equipment goes where, (right down to the 12" binoculars etc.) however, in several areas the instructions have you put on pieces that make the completion of the kit impossible and in other sections ask for pieces from frets which are not part of the set. (Go figure)
The Lion Roar Nagato PE set was incredibly complete, including turned brass barrels not only for the main armament, but also for the 5" casement guns and 12.7cm AA guns. The kit included PE for all AA guns right down to the 25mm single mounts peppered all over the ship. A very good value from sellers on E-bay at about $50.00. (Much less than if you purchased all the sets separately.)
Takao, on the other hand, had a more traditional PE enhancement which was done very well (with the exception of the usually incompetent instructions written by someone who has obviously never built the kit or even seen the PE set. The PE set did include turned brass barrels for the main 8" guns, but not for the 12.7cms or the other AA guns. I had to purchase Lion Roar or Flyhawks after market AA gun sets for this ship.
Both ships are airbrushed with Tamiya water based acrylics, and rigged with 20 denier fly tying monofilament. The sandbags and hammock shields on Nagato are made from A+B epoxy putty (as shown on Jeff Lims blog page which you can find from his Nagato in the ModelWarships.com gallery.) Rope splinter shields are made from thick thread which I first coated with anti-fray glue called "FrayCheck" (from the sewing shop) in order to stop fraying but allowing the thread to remain pliable enough to go around the railing without bending the PE railing. I used CA glue to tack them down, washed them with diluted brown paint and finished with the gray bands made from scrap PE pieces. (With a total of 22 PE frets used on these two kits - you will have a lot left over). The searchlights on Nagato are drilled out, painted aluminum, and then I put a large drop of Liquitex thin gel onto each to create the search light lens.
The water is Liquitex gel over plexiglass painted on the underside prior to affixing to the base. I used the thicker Liquitex gel (heavy) for the wave body and then brushed the much thinner Liquitex over the first layer once dried to fill in the wave a bit and give added depth. The Liquitex is drying much more slowly than anticipated as I have to keep it covered most all the time for fear the kitties (or others) may get too close. With the amount of PE on these things, virtuaully any and every touch causes damage. Eventually, the sea waves should dry perfectly clear.
The base is made from 3/4" oak plywood which I framed in 3/4' solid oak. By cutting a rabbit (groove) into the plywood to receive the plexiglass prior to attaching the edge framing, it created a perfect channel to accept the plexiglass. The final step was to route an ogee detail around the outside of the base frame and stain. Plexiglass case is made from basic 1/8" plexiglass from Home Depot welded with JB weld as explained here: http://www.shipmodels.info/mws_forum/viewtopic.php?f=4&t=33094.
Overall a fantastic build for the masochistically PE minded! As always, please feel free to e-mail or PM me for questions or other details I have inevitably left out.
