by Paul Neuhaus
1/700 IJN Diorama (Fujimi)
Some time ago I came across the sites of Modelwarships.com and Steelnavy.com and very much admired the models shown there. Reason for the Internet search was that I wanted to bring my old hobby back to life. I bought some reduced Revell ship model kits at a local store and was looking for some tips or hints for making the models look good. Now a days you can find almost anything in the Internet... and I found wanted!! I placed a couple of questions (regarding details etc.) on the message board of the mentioned site and a German model builder, who also often visits the board, suggested I visit the site www.Modellversium.de ... I was also very impressed with the pictures I saw there. Excellent work !! This report was originally issued in German and sent to the mentioned site in Germany. About a day after it had been published on the Modellversium site I received a very kind mail from the well known model shipbuilder Jim Baumann (one of best I think) who asked me, if I wouldnt like to send my report and pictures to this site so, here we go
Well, I think this is enough of introduction--. A 1/700 scale vessel was to be the next project I wanted to start. After thinking about what to build and searching the Internet I found a kit that should suit me for the beginning. My choice fell on the HMS Dreadnought, which must have been one of, if not even the most famous battleship of its time. I ordered it at NNT Modellbau (http://www.nntmodell.com) a German internet store which sells a wide range of ship models in various scales and from many manufactures as well as accessories for reasonable rates. The kit was charged at 43,00 EUROS + shipping costs, which I think is acceptable. I also ordered some PE parts for further detailing (the original kit did not include any railings for example - I got this information from the kit descriptions on the web sites Upon openening the kit, which arrived a few days after I had arranged for the payment; I nearly fainted this model was so small and the parts so delicate and tiny.-- Good Lord, I thought, youll have to try something else or practice before you have a go at this one...!!
When visiting a local model store a few days later I noticed some 1/700 ship models in the odd box and decided to have a try at a Japanese light cruiser and destroyer to give it a start. The kits were cheap and I thought, OK, if you ruin them then the financial loss would not cause a pain in your neck. Both kits were produced by Fujimi (I had not heard of them before). The quality of the kits was not too good, but one cannot expect too much for little money.
I started with the cruiser (which was approx. double in size compared to the destroyer). The name of it in true life was Natori and (according to the documentation included in the kit), had an overall length of 158 metres and was launched 1922. According to my Internet investigations it mainly operated in Pacific regions between 1940 and 1942. It was sunk through a torpedo hit. The destroyer was called Matsu (which seemed to be a destroyer class Ill have to investigate a little more when I find the time), had an overall length of 98 metres and was launched in 1944. This vessel was also sunk through a torpedo hit.
So I started building the cruiser. First I went over the hull, which was delivered in one piece (drilling out the port holes, sanding etc and then spraying (airbrush) with thinned down paint N° 74 from Revell (a very dark grey). The decks were coloured with a paintbrush and Revell N° 86 (light brown). All paints are matt and should almost match the original colours if one can believe the details mentioned in the kit. After this the superstructure followed, also painting, detailing and fitting to the hull. Meanwhile the PE set, which I had ordered at NNT (general set 1/700 for Japanese light cruisers) had arrived and also took part in completing the model. I had no experience what so ever with such small PE parts and had to pay a lot of apprenticeship dues (in total three of the four aircraft catapults which were included in the PE set were flat and ruined before I managed to bend and glue the last one in to a decent and acceptable shape. (handling this made me curse a lot )
I continued with the details. The small hangers for the life boats which were included in the kit seemed much too thick to me so I made some news ones from thin copper wire and fitted them. Same for the barrels of the anti aircraft guns these were not only too thick, but also ruined through plastic smothered between them. So I completely cut them off and replaced them with new ones I had made out of stretched sprue. The small aircraft that was included in the kit was totally un-useable. It was bent and parts were broken off. In the model shop I mentioned above I also found a box of Japanese aircrafts in the same scale and decide to use one of them to replace the original one. The plane included in the kit was a bi-plane and the ones in the small box were normal ones. I thought that this would not be such a great problem and took one of them for completing the model. (parts and paint were added and then it was mounted on to the PE catapult).
The rigging was made of stretched sprue (thanks everybody for that hint!! ). I also used it for making the oars of the lift boats and for the flag masts at the back of the ships. The main masts are the original ones out of the box although I was thinking about making new ones out of brass or similar more than once. (for reasons of stability however, when using stretched sprue as ridding material it is OK to use the original ones). The ropes were made of very thin copper wire, which I took from an old radio transformer (wind it round a thick needle, pull it off as a coil, flatten and paint it in a suitable colour. The blastbags were made with white glue, which I modelled round the barrels with a toothpick after they had dried I painted them white.
The weathering was done with pigment colours (powder), matt clear varnish (Revell N° 2) and thinner. Mix up everything very well and put it on the parts meant to be stained or coloured. Thin it down a bit more or less to get the wished results (try it on a bit of old plastic or paper etc. before you putting in on the model). I also used the matt varnish for gluing the stretched sprue rigging into place, which went well . I think this method is better than model cement or normal glue, because the varnish does not attack the plastic or make it go soft like the cement does. Another point is that you do not have to put any matt varnish on the glue spots to stop them looking shiny. I also used this method for gluing the railings into place. I think this is better than super glue, which is thin as water, runs all over the place and can ruin a model or certain parts of it. Maybe Ill try the jelly type super glue the next time - that should stay where it should or where I want it too.
The destroyer was built in a similar way. This kit however needed much more work to be done to the hull there were dents which had to be filled and sanded and it showed no portholes. I had to draw them on to the hull and drill them out. The kit contained no details what so ever regarding hill details, so I copied the number and position of the port holes from the picture on the kit box.
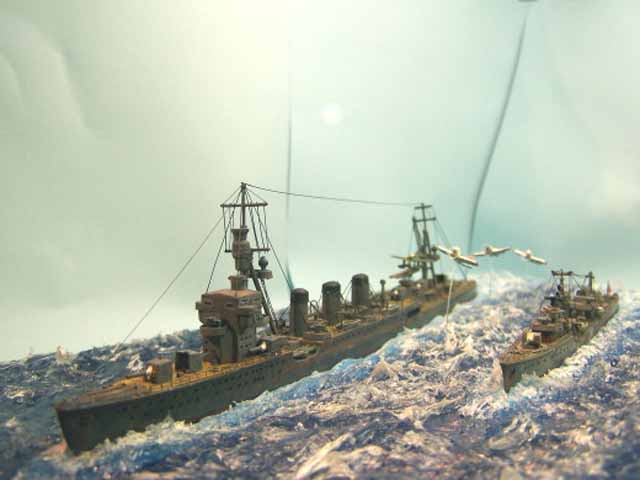
The water surface (also my first have a go at doing this) was done using the silicone method shown on the site www.modellmarine.de (thanks to Frank). But I used a plywood board instead of the styropor-board that Frank used (I thought it would be more sturdy) (only an excuse I didnt have a styropor board available at the time .). The modelling of the water surface went straight forward and with no problems at all. Finally, both vessels were launched.
The last kick was done through adding three of the small Japanese planes which were painted, detailed and added to the diorama (using 0,4 mm clear fishing line drill a 0,5 mm hole into the water and into the plane and then stick it together). The turning props were made of punched out clear thin plastic.
Personally Im quite pleased with the results and think I can now dare to have a go at the HMS Dreadnought (pictures and building report to follow) perhaps I should rather do some practicing in digital photography ?
Im sorry for my English, which unfortunately is not perfect.
I wish everybody a lot of fun and success with there projects and Im always pleased to be a help to anyone who might need a hint or has a question.
