by Douglas Conrady |
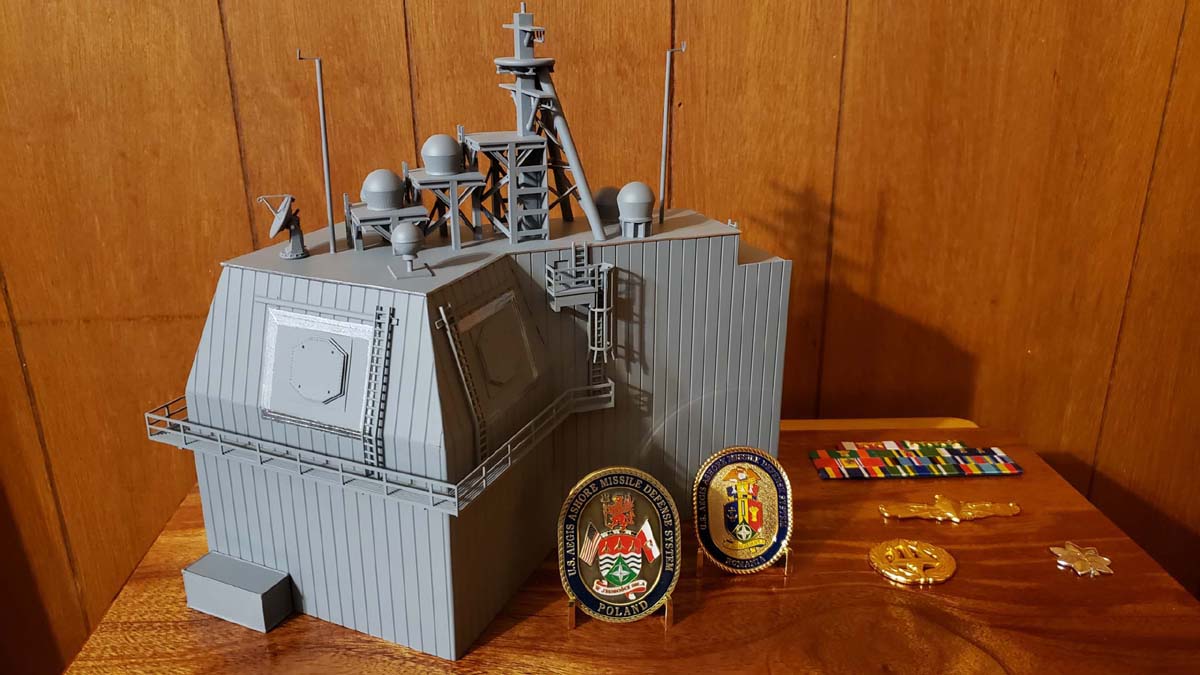
And now for something completely different. I know this isn't a ship, but it is ran by the Navy and has ship parts.An Aegis Ashore is basically the guts of a destroyer put on land. This is the Navy's version of on-land BMD.A few months ago, I was asked if I would take on the task of making a scaled version of an Aegis Ashore installation. After a few days of combing through pictures, I figured I could. I've never scratch built anything of this scale before. Sure a part here or there, but never an entire project.I did cheat a bit, the radomes, missile director, spy radar panels, and the conex box are 3D printed. Those items also dictated my scale. I'm guessing they were designed for the models that one actually puts on the water. After I found those, I began to figure out how much of the materials and which materials I would need. I had gotten a 1/350 version of an Aegis Ashore printed, but my commissioner wanted bigger. So bigger I went. I did use the smaller version as a reference.First on the list of things to make was the deck house. This is the square part of the building that houses the spy panels. After measuring the 1/350 version and converting to 1/144 scale, I used online tools to check all my measurements (especially the trapezoid top) to make sure they made sense and worked with the other parts. I then mocked up the parts with paper to check fit. Surprisingly, the parts fit with just a bit of sanding. It was then onto the shark fin. This is the rectangle part of the building that goes back. The hardest angle to figure out was the one that buts up against the deck house trapezoids at a 45 deg angle. Again, paper was my friend.At this point I figured Id better make the flat areas where the spy panels go. I just cut the square out of the wall and turned it around. I scribed the panel lines from there. After ALL the building sides were made and test fit and checked..... and checked.... and.... you get it. I commenced with the gluing.I then went to the roof. Again measurements were taken, upscaled, and checked. Then I checked some more. I started with what I call the platforms. This is everything forward the main mast. I even got a new tool to assist with that area, a Chopper II. That area was fun to build. All the support beams and sub support beams....Next was actually the walkways and railings. Those were pretty simple to do after learning on the platform area. Nice 45 deg cuts. The mast came next, and I knew the worst part would be the main support pipe behind the mast. Again, I used math to my advantage and used triangle calculators to assist. There was an element of guesstimation on the cross beams. I couldn't really measure in there, so I'd cut a beam close, test fit and then trim to fit. The yardarms/platform finished off the mast. With the most difficult part being the supports under the circle platform.Detail time!! Ladders started the process. They were pretty simple, I used the same angle as the deck house. By this time, I was taking extra time to make sure I hadn't missed some detail that would cause me much grief. I did not want to have to tear something apart to get some other detail in . Next was the radomes and their parts. For the scalloped base below the aft, port radome, I cut up left over pipe from the mast support and flipped them around. What I had initially thought were flag poles, turned out to be lightening rods.Painting was done in 3 parts, the building, the 3d parts, and the platform/main mast sub assembly. After priming, everybody got a coat of neutral gray. Easiest Navy paint job I've ever done. I had noticed chromed/stainless steel/flashing parts on the installation and I wanted to recreate that. I found a liquid chrome paint pen, and boy, the name does not disappoint. The squares around the SPY panels and the lip of the roof were given a shiny coat. If nothing else, it offsets the neutral gray nicely.Somewhere in there I figured I'd better start the base. The base is Mahogany with clear polyurethane as its protector. My commissioner sent me all the goodies that are on the base, except the plaque. My wife gets credit for the way the coins are. The coins are different because my commissioner was commander at both Aegis Ashore installations and he sent me a coin from each location. Both coins are so different on each side, It would've been terrible to cover any of the sides up. My wife suggested standing them up. What a great idea!! Now one can get the coins out and admire both sides.As I was finishing the project, I was tasked to put lights in. I had not planned on electronics, so I was hesitant because I was afraid the light bars and wires would be obtrusive. Happily, I was wrong. I think they look great. Yet another 1st for me, on this first of firsts project.I think I killed a small tree with all the notes I've taken. I figured I might have to do this again, so I documented everything. I'd guess I could do this again much, much quicker since I wouldn't have to figure all the calculations or how to make the parts.Thanks for looking and don't throw rotten tomatoes.Douglas
