by John Lemire
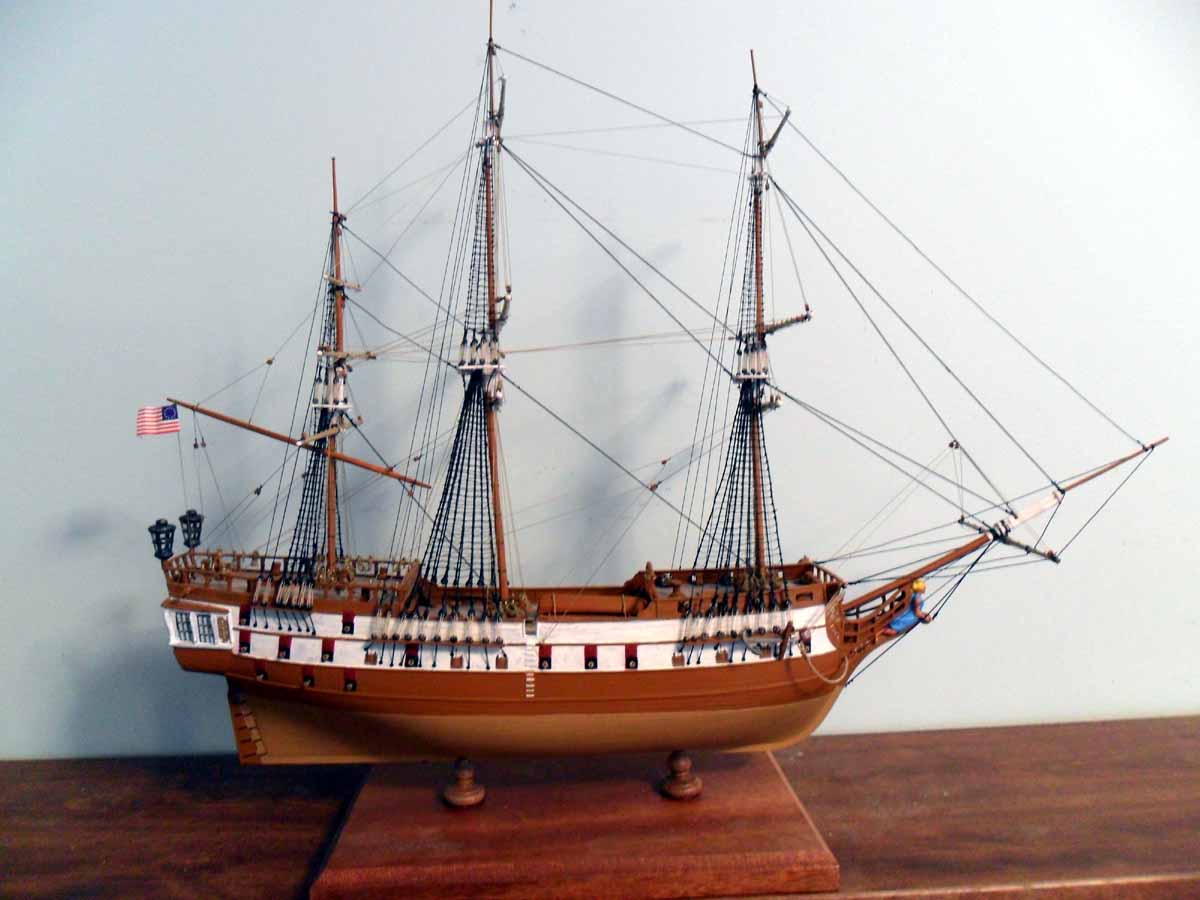
1/132 Bon Homme Richard (Monogram)
This is the newly re-released Monogram Bon Homme Richard in 1/132nd scale. The mold is classic 1950s with many defects.
First of all, the figurehead is pathetic with oversize hands and feet that looks like flippers and almost nonexistent facial features. They also did something cute by leaving flat plastic where the stern windows are located and provided cardboard cutouts. They look OK.
Now begins the challenging stuff. Most of the gun port hatches were molded open. The recessed gun ports were much too shallow. But the real kicker was that the remaining hatch covers had a large tab molded into each one that then fit into a slot over each gun port. Needless to say, I filled and sanded the slots and fabricated new hatch covers out of wood. I then made some primitive hinges with masking tape and drilled the holes for the pull ropes.
The planks on the sides of the ship to which the dead eye assemblies are affixed are typical Monogram/Revell with the strops molded in and the dead eye combos also molded in. I first positioned each one to determine where to drill holes in the hull. I then cut off everything and sanded down to the basic plank and then drilled holes for each deadeye. I glued these into position and proceeded to go deep into my parts inventory supplies to find enough dead eyes in the right scale and using black thread positioned each one, ran the thread through the plank and into each designated hole in the hull. I then pressed a nail into each one and from the inside, as extra security, tied the two ends of the thread around the nail and added a drop of glue.
Oh, I also had to pre-paint the two sections of the hull before proceeding with this activity.
Also common on these older kits, the manufacturer molded coils of rope onto each deck. I had to use a flat saw to cut these off and then sand flat. And all of the hatches and grates were solid. So I had to use a small drill bit and pin vice and literally drill each one open to improve the appearance.
Then I did my usual deck planking, using Crazy Glue to individually glue each plank to the deck. Once you do this, you simply cant go back to antiquing a plastic deck.
I also had to cut off and sand down every single nubby that was supposed to be a belaying pin and drill holes in order to replace them with turned brass ones.
Now, with the hull and deck assembled and finished, I made a very startling discovery. Well, first of all, in my opinion, the masts were a tad too thin for the overall characteristics of the hull, but I used them anyway. Heres the kicker all of the yardarms were molded into the preformed heavy plastic sails.
I was really discouraged at this point and was looking at two options: (1) make an admiralty model with no masts or rigging; or (2) throw the thing away and write off my loss.
For the heck of it, I went to the basement and scrimmaged through about 40 years of spare parts and, lo-and-behold, I found a complete set of yardarms that were just about the right size. So I continued.
It takes a LOT of work and is extremely tedious, but there is nothing like handmade ratlines; each knot meticulously tied and each ladder built. Fortunately I had enough deadeyes and blocks in my inventory to complete all of the rigging.
The kit did provide a length of chain for the anchors. However, if my memory serves, they were still using corded rope for the anchors. I replaced the plastic anchors with metal ones of the same size and style and the chain with rope.
On the one hand, I would never recommend this kit to a serious builder; but on the other hand, it was a challenge and the end result was fairly satisfying.
