 |
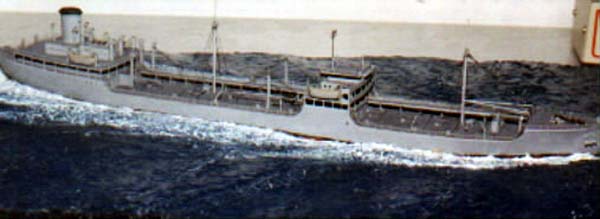
| 1/400 Revell T-2 tanker |
| The old Revell kit was the basis for this model. I removed all the
molded on railings, and beveled the bottom edges of the decks so they would
fit down into the hull to get the proper height after removing the rails.
Upper decks were also thinned in this manner so the vertical spacing would
look right. I scratchbuilt a new bridge front from plastic card, a aft
deck house and skylight, new catwalks and supports, and the anchor winch.
I scratch built new davits for all the boats and all the rigging was added
from brass wire. The railings and ladders are from Gold Medal Models. The
water is made from acrylic gel medium, built up in layers. Likewise the
wakes.
The Revell T-2 was one of the first ship kits I ever built. I decided to re-visit the kit taking advantage of some of the after market products and techniques that did not exist when I first assembled the kit back in 1958. I could have gone a lot further with the kit, but frankly I got tired of working on it. |
| The water base technique used here was an experiment, trying
out some new materials. This is only the second water base (2nd. action
water base - flat surfaced / still water bases don't count) that I have
attempted so for me there is more to learn. And, like almost all the scale
water effects I have seen at numerous model meets, it looks a bit better
in the photos then it does in "real life".
The base is a piece of styrofoam (the dense type used for packing material) that was cut to the size of the wood base and is about one inch thick. I pressed the troughs for the basic swells down into the surface, then traced the outline and cut out the plan of the hull so the model could sit down into the material. I found this was easier to do than cutting the Revell hull down to waterline. The wave patterns were then applied to the surface with acrylic gel medium - a product you can get in several brands at any good art supply store. It tends to seek its own level, shrinking in height, so these waves were built up with several layers. Then more was applied over the entire surface with larger quantities applied to the tops of the swells to build them up a bit and to give them a pattern. At this point I painted the basic surface color - a very dark blue (I think it was Testors Sea Blue (or Navy Blue) - very dark. I used three different shades of blue for the water, applying and blending until I got the color I wanted. Then I placed the model in the base, and filled in the gaps between the cut-out and the hull with more gel, then repainted the blue, and the areas up to the hull. The wake was then sculpted - again using gel medium, built up gradually. I have seen postings to the effect that wakes cannot be formed with this material - that is not true. They just cannot be formed in one or two applications - the material must be carefully built up, and it behaves like white glue, as it startes to dry it can be shaped to some extent. Patience is the real secret. After the wake was formed I painted it with white, and I think the real secret here is to apply it very slowly with a small brush, and using drybrush technique for the small bits of foam inside and outside the main wake patterns. Most models I have seen tend to use too much white and too solid an application for the wakes - which is why they don't look "real" - at least that is my opinion. Find a photo of a similar ship (I actually found an aerial view of the Mission Capistrano at speed) and try to match what you see in the photo(s). I believe that to do effective water you must "model" it just as you do the ship. It is not enough to get a piece of blue shower glass and paint a white wake on it. I have seen this recommended and I have seen it done - and to me it does not look very convincing. Last, after I got the colors and shapes I wanted, I added a final gloss finish to make the water look "wet". For this I have tried (on the other "action" base and the three flat water bases I have done) several hobby paint gloss coats and frankly I don't like any of them very much. I have also tried "Future" floor wax, and it gives a pretty good result. However, my favorite solution so far (as used on this base) is a product my wife uses for her plaster craft figures and christmas ornaments that she makes every year. It is a acrylic clear glaze sold for finishing ceramic figurines and it dries very glossy indeed, and with no brush marks. There are several brands, in fact it seems every time we go to buy some, the brand is different. There are two types, one with "sparkles" and one that is clear - use the clear. One coat is usually enough, two is even better. You can find this stuff in any art or craft store like "Hobby Lobby or "Michaels". I hope this is helpful or at least gives you the inspiration to try it. There are a lot of different techniques used for water. This is not my ultimate method, I am still not entirely satisfied with the results, and there are a couple of new things I still want to try. Experiment... you might come up with something even better! Get out a scrap kit, a hull you don't care what happens to, and try it! You will learn more from that experience than any number of pages like I have just written. |
| Daniel
Jones
Editor/Publisher Plastic Ship Modeler magazine |
