by Sgt. Ryan Labieniec, USMC
1/144 USS Sennet SS-408, 1963 (Trumpter/IBS)
This project began with a request from Commander Emory Brown, USN (Ret), to build the USS Sennet SS 408, which he trained aboard while he was a midshipman at the US Naval Academy. He trained aboard Sennet in 1963, after she had been updated to a Fleet Snorkel Sub from a WW2 Balao class. My search began with a posting on the Finescale Modeler forums for kits or conversion kits to match my needs. I was happy to receive several replies very quickly and eventually I was directed to Iron Bottom Sound. IBS has conversion sets for numerous scales, including Trumpeters 1/144 Gato. Based on Commander Browns specifications on what he was interested in, the Trumpeter kit with the IBS conversion was given the green light. I contacted Mario Grima of IBS, and explained my project to him, and he informed me that Trumpeters late war Gato with IBS Builders PM set would best suit my needs.
With both kits ordered and enroute, my research began, and I must say, this project required more research than probably any other project I have yet undertaken. I spent countless hours on the internet checking and rechecking details, dates and sorting out inconsistencies in information I found. Numerous e mails were exchanged between me, Commander Brown, and many online resources.
The biggest hurdle I encountered in my research was the inconsistencies in different boats of the Fleet Snorkel class. It got to the point where it seemed that no two boats of the class were the same. I cross referenced photos from the USS Sennet website SENNET.ORG with technical data from the Naval Historical Center about the Fleet Snorkel conversions. Some boats of the class had steel decks, some had partial wooden decks, some boats had 1 topside sonar dome, some had 2 and some had none at different times in their post-war careers. My suggestion to anyone attempting a Fleet Snorkel conversion is to rely on information and photographs specific to the boat you are modeling as much as possible to minimize the inconsistencies.
The only modifications to Trumpeters hull necessary is replacing the left side anchor well and filling in the right side anchor well. I made one big slip up in this area that unfortunately I did not notice until I had completed the kit. On some of the Fleet Snorkel boats, the anchor was on the right side, and I failed to cross reference this detail with photos of Sennet, so I replaced the right side anchor well and filled the left side well, OOPS! These modifications were straight forward and fairly simple.
I traced the rough shape of the IBS anchor well onto the hull with an alcohol pen, slightly smaller than the hole I would need as it is always easier to remove more plastic if needed. Using a #11 exacto blade I cut out the shape of the anchor well and then test fitted and trimmed more plastic until I had a snug fit for the IBS anchor well. The IBS well was super glued in place, and any gaps were filled with Squadron white putty, and sanded smooth. Squadron putty was used to fill the opposite anchor well and sanded smooth using Flex-I-File sanding sticks, being careful not to remove any of the surface detail on the hull.
The 2 hull sides were glued together as directed in step 2 of the Trumpeter instructions over the Trumpeter included inner support tube, and a minor seam on the bow was filled and sanded smooth. Step 2 in the instructions is where I stopped with the instructions for a while. The deck requires modifications, and I prefer to leave the screws and fins off to prevent damaging them until late in construction.
The Sennet had a combination of steel deck and wooden planking. Based on the photos of Sennet, I determined the steel deck to start just aft of the 2 small access hatches (which are engraved in the Trumpeter deck) and continuing forward to the bow. I used my alcohol pen and a ruler to mark the transition line from wood to steel decking. I removed the few molded on surface details from the area that was to be steel decking. I laid a strip of masking tape across the deck along the transition line I traced earlier to leave a crisp straight line, and I covered the entire deck area in front of the tape with a thin layer of Squadron white putty. Once the putty was dry, I sanded the putty smooth, leaving the t ape in place to prevent marring the engraved planking detail on the deck.
I test fit the IBS sail to the hull, and found that the lip molded to the Trumpeter deck protruded from under the corners of the IBS sail due to the differences between the shapes of the WW2 sail and the post-war sail. I traced the edges of the IBS sail onto the lip where it protruded and removed the protruding areas using a razor blade and a #11 exacto blade. If you cut too deep, you will be left with a rather large hole that needs to be filled, but if you are careful, and use a fresh razor blade laid on the deck and slowly shave the desired area away, you are left with a clean flat surface.
Using the photos on the Sennet web site, I fitted and marked the locations of the 2 sonar domes on the deck fore of the sail. I did not have a set of plans for the Sennet, nor did I want to get down to the exact science of plotting locations with a micrometer, so the locations of these domes was done to simply match the photos as close as possible using deck details and the naked eye to determine their best placement.
The Sennet would have rails installed while she was undergoing maintenance or was in port, but as I did not want to build her in this configuration, I filled all of the holes for rail stanchions in the deck.
Next I attached the deck to the hull, and fortunately the fit was excellent, and required minimal seam filling and sanding. Once the deck was attached, I sanded the 2 sonar domes considerably (as is usually necessary when working with resin products) and glued them in place where I had marked their locations.
The photos also show a few small access hatches on the steel deck. I used some spare hatches from the Gold Medal Models 1/350 doors and hatches set, the sizes of the full size doors in 1/350 are a good match for the small access hatches in 1/144.
This was by far the most difficult and time consuming aspect of this project, calling for a lot of research, sanding, scratch building and test fitting.
The instructions included with the IBS kit should be used as a rough guideline; however, your own references should be most relied upon, as was my experience building the Sennet.
The IBS sail has engraved induction hatches on both sides of the rear of the sail, however Fleet Snorkel subs only had 1 induction hatch, and the side depending on the specific boat. Sennet had her induction hatch on the left side, so I sanded the hatch on the right side smooth with a Flex-I-File sanding stick.
My next step was researching where all the rails and grab handles on the sail were to be placed. I used my photos as a reference and marked the locations where I would install these details on the sail itself. Once I was satisfied with my markings for placement of the rails, I used the wire included with the IBS kit and cut and shaped the various rails and grab handles, but left them off of the model until later in construction. I drilled small holes where the rails and grab handles were to be installed, using a micro drill bit and a pin vice.
Note also that the various periscopes and antenna arrays are left off until later in construction as well, since they will be painted individually and are quite fragile.
Here is where I decided to exercise a little bit of artistic license.
First, I simply super glued the sail to the deck on the lip that I trimmed earlier, taking special care that it was centered and parallel with the sides of the boat.
The IBS instructions say to make a concave lip around the bottom of the sail with epoxy or putty. I made several attempts at this lip with putty, but each time I was unhappy with the results. It looked to me like a childs mess of play dough (maybe that just says something about my sculpting skills). I sat back from my workbench and brainstormed a little, and at the same time put in a little time on another project to help clear my head. After a bit of pondering, I found myself staring into my scrap drawer, and fixed upon a wire from an old set of head phones that I sometimes strip off and use for rigging 1/350 ships. The wire was wrapped in the protective black rubber coating, and struck me as being very close to the size of the gap at the bottom of the sail. I cut a small length and put it along the gap to see how it looked, and to my pleasant surprise, it looked darn good (if I dont pat myself on the back a bit). It is not quite exact to what my reference photos show, but I did not see it as a big inaccuracy, and thought it just looked right. I removed my test piece and super glued a longer length of the wire all around the gap; it worked great, as the wire is very flexible and easily conformed to the complex curvatures of the sail. I only used 1 length, and started on one of the long straight sides of the sail, so I would not have to join the 2 ends on a curve.
I installed the rudder, shafts and braces (all the parts in Trumpeters step 3 except for the screws) to the stern of the boat to be painted along with the hull.
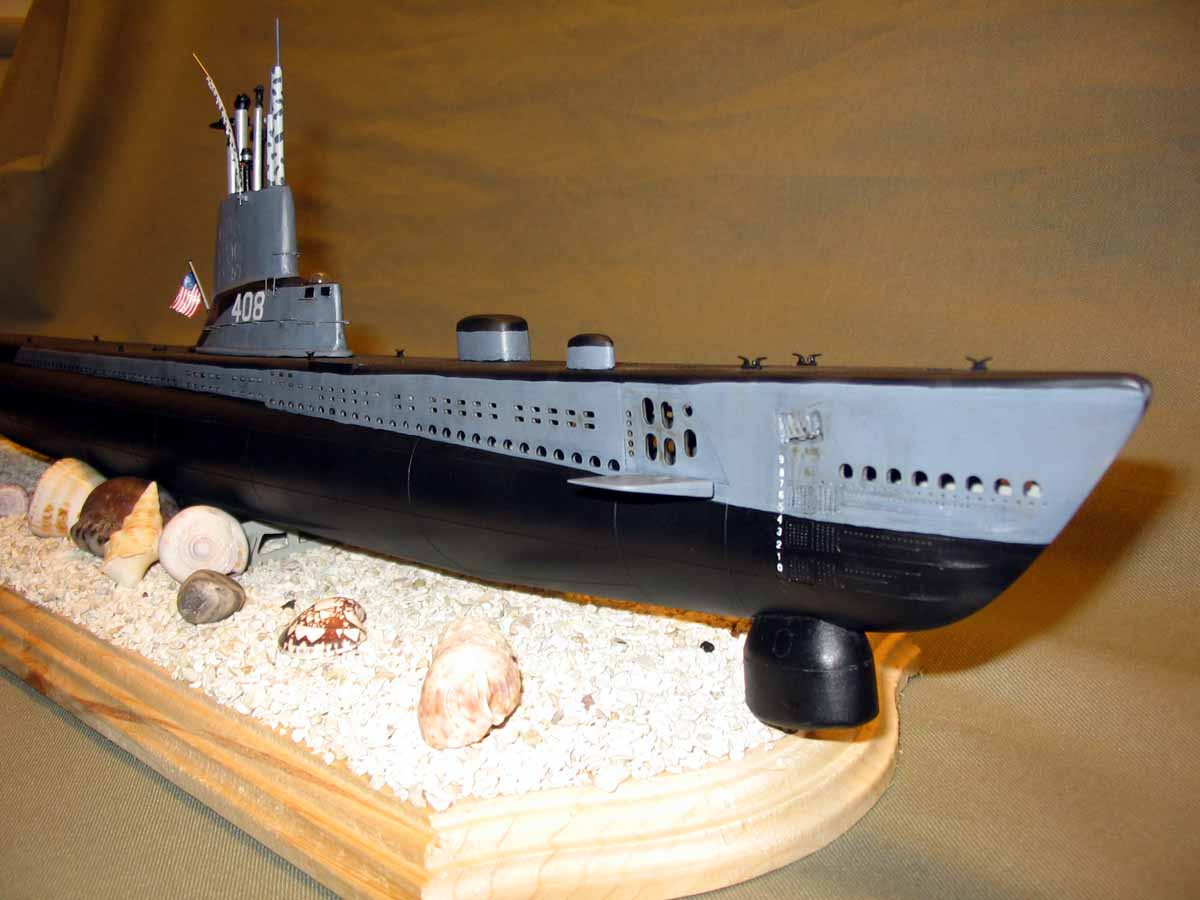
The Sennet wore a 2 tone paint scheme, overall black with grey on the upper portion of the hull sides, and a grey sail with black stripe. Some of the Fleet Snorkel subs wore all black schemes and still others with different configurations, so again, check your references. I used all Testors Model Master paints
I began with air brushing the entire hull and the stripe on the sail flat black. I applied several coats, since I realized after the first coat dried that the slightest brush against something sticks out like a sore thumb with only 1 coat of the black.
In all of my photos, the lines between the black and grey on the Sennet appear to be painted by or at least touched up by hand. The lines appear to be uneven and a bit wavy. With this in mind, I abandoned my trusty airbrush and went to old fashioned hand painting. I brushed GREY onto the sail creating a pattern matching my reference photos. The grey on the hull matches the painting guide supplied in the Trumpeter kit, with the exception of the transition from black to grey is a bit closer to the sail than on the painting guide. I brush painted the bow planes the same grey, but left them o ff the hull still to ease in applying the draft numbers later.
Once the overall model was painted, something just didnt look right to me, the boat was too flat. I do not know if the Sennet was painted in gloss colors, or if it was just a combination of water and oil that made her appeal glossy. I over sprayed the entire model with Model Master clear gloss, and that fixed the appearance in my eyes.
Surprisingly, this was the most frustrating part of this entire project, and easily one of my top 3 frustrations I have experienced as a modeler.
The Sennets hull # is 408, and the Trumpeter kit only comes with #212, for the USS Gato, so I began what I incorrectly assumed would be an easy search for some aftermarket decals to fit the bill. I searched every decal manufacturer I know of to try to locate simple unshaded 45 or 60 degree numbers in white. I was unable to find anything that would work from any of the major ship or aircraft decal manufacturers. The IBS website did have a link to jbot decals, so I checked there. Jbot decals did have what I was looking for, but as a small one-man operation, he had a minimum order of $20.00, which I thought was just a bit much since I needed only 3 simple numbers. I attempted to make my own decals using white decal paper, this produced dreadful to moderate results after numerous attempts. At this point I was more than a bit frustrated, as I had a near complete model sitting idle on my work bench for almost 2 weeks, so I threw out a lifeline to Mario of IBS. Again, more than happy to help a fellow modeler, Mario checked his spares box, and found extra 408s from a jbot decal sheet he had, and he mailed them out to me the very next day. THANK YOU!!!
The jbot decals are very good quality, but require all of the clear film to be carefully trimmed, which I found was easiest to do after they had been wet and removed from the backing paper. They went on the glossy surface easily, and were set using Micro Set, then over sprayed with more clear gloss when dry.
The ships name was added to the stern using model rail road dry transfers, and again over sprayed with clear gloss. A note of caution, the dry transfers are easily marred on the glossy surface of the ship until they are burnished with the paper included in the dry transfer set and sealed with the clear gloss (I learned this the hard way)
The draft numbers on the bow were applied in the same manner as the ships name, also using model rail road dry transfers. After the draft numbers were finished I glued the bow planes in place.
Now that all the major work was done on the sail, it was time to attach all of the details.
The IBS kit comes with a large array of different periscopes, exhausts, beacons, and other goodies that attach to the top of the sail. I found it best to check my references for placement of the specific arrays numerous times to ensure accuracy. Usually when ships are at sail, only a few of their many arrays are extended, most are stored in the sail, but I decided to model all of her arrays in the raised position, to add more visual interest to the model, since subs are rather plain with not many visible details.
I glued all of the rails and grab handles in place which I made earlier in construction into the holes I had pre-drilled. I used styrene strips to make the braces for the rails, and once all the glue had dried, I painted all the details by hand.
I wanted the Sennet to look like she was in service, not a static museum display, so out came the artists oil paints.
I first applied a thin wash of black artists oil paint to the entire ship, even the surfaces that were painted black. I let the wash run down the vertical surfaces of the ship to simulate oil and grime taking the path gravity would have sent it in real life.
Next, I applied burnt sienna to specific areas of the ship that are more likely to have a bit of rust (anchor well, bow planes, and rails and grab handles). The burnt sienna was thinned, but not nearly as much as I did for the black wash, to concentrate the pigment more in specific areas.
The stand included in the Trumpeter kit is a simple small display stand that serves its purpose, however was just not fitting for a project that I put so much effort into, and had such a personal history behind it.
I began at a local craft store; I bought a pre cut shelf that had nice shaped edges and woodworking to it (at least in my opinion, since my woodworking skills are not quite up to par with my modeling skills). I had extra crushed Florida coral from my home aquarium that I attached to the wood base using model rail road landscaping cement. The crushed coral is available at most pet stores that sell fish and fish thank supplies relatively cheap.
I glued the stand that was included with the kit to the center of the wooden base, and centered the Sennet on the stand. I then placed sea shells that I had collected when I was stationed in Okinawa during my time in the US Marine Corps around the kit stand until I found an arrangement that looked good, and also completely hid the kit stand. I used the shells I collected to add a personal military history touch, since the Sennet served in the Pacific theater in WW2, but shells are easily bought at craft stores and pet shops if you dont have access to a beach to collect your own. When I was satisfied with my arrangement of shells, I removed the model and used clear silicone to cement the shells in place.
I think the base came out very nice, and even if I had to buy all of the materials I used, the total price would still have been around $15.00, not too bad for the resulting look.
This was an overall very rewarding project for me to complete. It was a refreshing change from my usual 1/350 scale surface ships, giving me a chance to improve some skills not often used in my normal modeling practices. This was also my first time using an aftermarket resin conversion set, and also required more creative building techniques than many of my previous endeavors.
My sincere thanks to Mario Grima of Iron Bottom Sound, his guidance, generosity, and eagerness to help on this project is both much appreciated, and a reminder that sometimes a perfect stranger is willing to lend a hand.
I think the most rewarding aspect in the completion of this project however, is the personal touch. I have developed a strong friendship with Commander Brown, who has since commissioned me to build several more ships and planes from his career. As a Marine, and Operation Enduring / Iraqi Freedom veteran, military history (even if it is squid history) has always been an important part of my life, and the personal reward I feel having helped a fellow brother-in-arms relive part of his own military experiences is immeasurable. I look forward to working on future projects with Commander Brown, and we are currently beginning a diorama of his 1000th carrier landing in an F-14 Tomcat, but thats an article for another time. It is a heartwarming event, when a simple hobby can create friendships that bring 2 veterans of different generations, different services, and different wars, together over a common interest.
Semper Fidelis
